In this post I will show you how to integrate a PowerShell host into vRealize Orchestrator (vRO) leveraging CredSSP.
Throughout my time at VMware I have worked on many automation projects and most (if not all) of them have had a requirement to re-use PowerShell scripts that already exist. Customers just don’t lik re-working stuff they have already invested time and effort in producing, and that’s a fair comment. Sometimes there are valid reasons for porting to vRO (via Javascript) however there are those times where it offers no benefit.
Of course vRO has the ability to integrate with PowerShell and issue PowerShell commands but it cannot do this by itself (yes I know you can get PowerShell for Linux but it’s not supported on a vRO appliance).
We can just add a PowerShell host in vRO with basic authentication but in most cases it doesn’t give us enough functionality or satisfy security requirements. Lets look at an example.
The Scenario
In this case we have been given a windows server to use for executing PowerShell commands on but the actual servers we want to execute commands against are completely different, somewhere else in the environment. What we have here is a double hop authentication scenario where we need to gain access to the first PowerShell server and then invoke PowerShell commands against other servers which also require authentication.
There are a few methods that can be used, all with their pros and cons. The limiting factor is that the PowerShell plugin within vRO uses WinRM and does NOT support credential delegation which might ordinarly be used outside of vRO. So in this case we are going to use CredSSP.
Our environment is made up of:
- Windows 2012 AD domain
- Windows 2016 member server (designated to be our PowerShell proxy server)
- vRO 7.4 standalone appliance (configured with vSphere authentication)
- vSphere 6.5 VCSA
WARNING – THIS IS NOT A 2 MIN CONFIGURATION!
Step 1 – Get a SSL Certificate
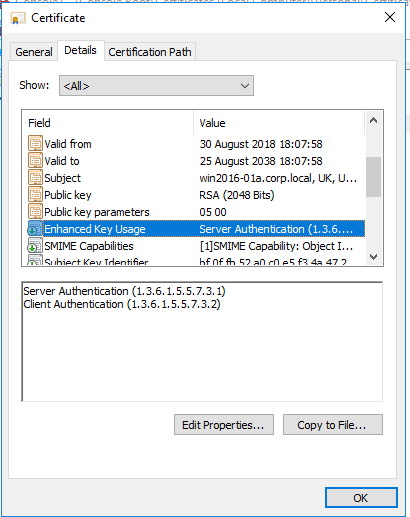
Our first step is to obtain an SSL certificate that we can install on our PowerShell proxy server. WinRM requires that any SSL certificate used must have client and server authentication enabled. If you open the certificate in Windows then the “Enhanced Key Usage” field should tell you if your certificate has both enabled as shown here.
If it doesn’t you will need to generate a new one using a certificate template that has these options enabled.
Step 2 – Configure WinRM
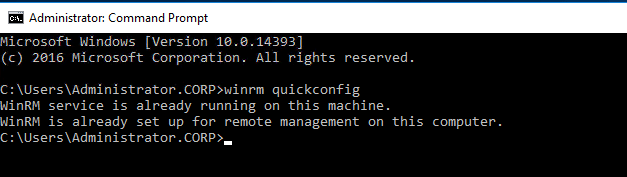
Once installed on the proxy server we are going to configure WinRM. This is the method that vRO uses with PowerShell. First we do a quickconfig to enable the service and set it up for remote management.
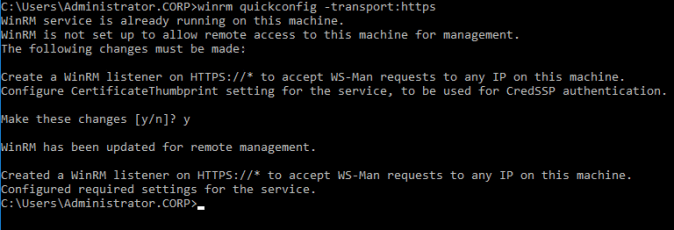
Next we enable HTTPS so that we can issue commands using SSL.
You can verify the configuration has been taken by checking the listener configuration.

If all is Ok here then we can continue and set the authentication options that will be available for use. These are:
- winrm set winrm/config/service @{AllowUnencrypted=”false”}
- winrm set winrm/config/service/auth @{Basic=”true”}
- winrm set winrm/config/service/auth @{Kerberos=”true”}
- winrm set winrm/config/service/auth @{CredSSP=”true”}
- winrm set winrm/config/client @{AllowUnencrypted=”false”}
- winrm set winrm/config/client/auth @{Basic=”true”}
- winrm set winrm/config/client/auth @{Kerberos=”true”}
- winrm set winrm/config/client/auth @{CredSSP=”true”}
- winrm set winrm/config/client/auth @{TrustedHosts=”add comma separated list”}
Note that the above options may need to be tweaked to satisfy security requirements (i.e. removing basic authentiction).
The trusted hosts should be a list of machines your proxy server needs to authenticate to however this normally only needs populating if the proxy and target machines are in separate untrusted domains.
Step 3 – Enabling Credential Delegation
For CredSSP to work with multi hop authentication we must tell our proxy server which computers are our target computers. This is done by applying a GPO to our proxy server. We can set individual targets or use a wildcard for the domain depending on what we are trying to achieve. In this example I am going to create a new GPO and apply it to the OU that our proxy server computer object resides in and restrict delegation to just a single server.
Our policy settings are located here:
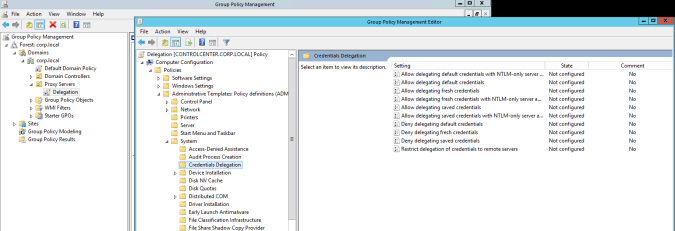
We are going to configure the following settings:
- Allow delegating fresh credentials
- Allow delegating fresh credentials within NTLM-only server authentication
In each setting we add the server (or servers) we will be delegating credentials to.

Once the policy updates have been made the settings need to be pulled down onto the proxy server usign a “gpupdate /force”.
Step 4 – Service Principal Names
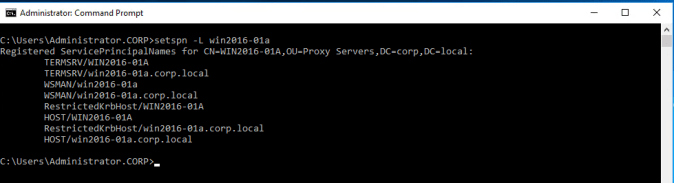
SPN’s need to be defined for our proxy server in order for credential delegation to work. You can check whether they exist or not for the proxy server by performing “setspn -L servershortname”.
Here we can see that our server already has SPNs for the short and FQDN hostname. In this case no further SPN configuration is required.
If you do not see SPNs then they can be added by performing “setspn -S WSMAN/servershortname” and “setspn -S WSMAN/serverFQDN”. If the SPNs do not exist then once you have created them you will need to restart the WinRM service.
Step 5 – Granting Private Key Access
The next step is to grant WinRM access to the private key of the SSL certificate we installed in Step 1. WinRM uses the network service account so this is the account we will grant access to the private key for.
First we need to locate the correct certificate by listing all the certificates in the personal key store.
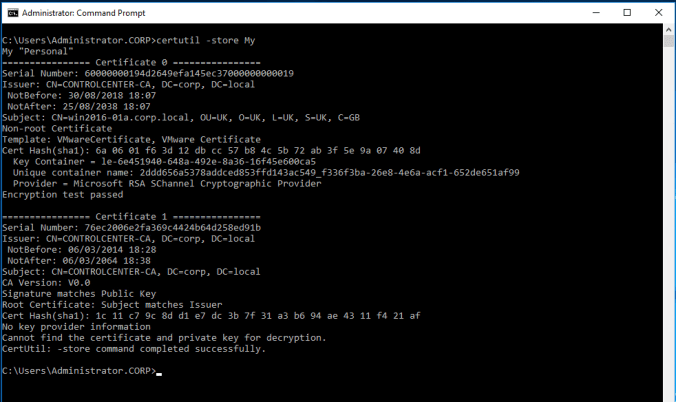
We need to make a note of the container name for the SSL certificate we are using. In our environment the container name would be as shown below.
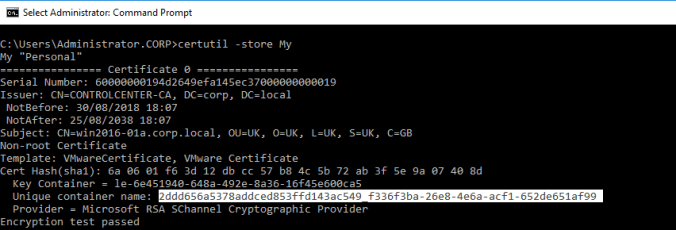
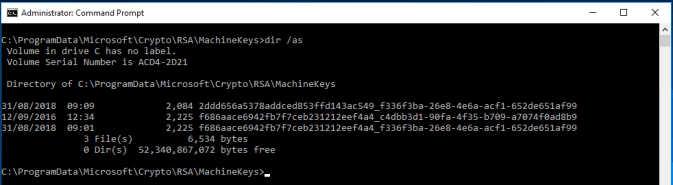
To grant WinRM access to the machine key we first need to find the private keys. They are located in “c:\programdata\microsoft\crypto\rsa\machinekeys”. As the keys are hidden files they can only be seen from the command prompt using the “/as” switch on a directory listing. One of the filenames should match the unique container name of our SSL certificate.
To grant the WinRM service access to the private key file we can use the “icacls” utility as shown below.

Step 6 – Testing Multi-Hop Configuration
To test our applied configuration works we can use the Windows Remote Shell utility (WinRS). In our test we are going to use WinRS to connect to our proxy server over HTTPS on port 5986 with a username and password and then use that same password to authenticate to our second server to perform another command via PowerShell (creating an empty directory).

If all goes well then the command should complete with no errors. At this point all of our windows configuration is completed so we can now turn our attention to vRO.
Step 7 – vRO Kerberos Configuration
The Kerberos configuration file within vRO needs to be populated so that we can use this mechanism when configuring the PowerShell plugin within vRO. The location of the configuration file may differ depending on whether you are using vRO that is embedded within vRA or a standalone vRO appliance.
The locations are:
- Embedded vRO – /etc/krb5.conf
- Standalone vRO – /usr/java/jre-vmware/lib/security
Note as of standalone vRO 7.4 the krb5.conf file is now located in the same place as embedded vRO (/etc/krb5.conf).
The default file looks as follows:
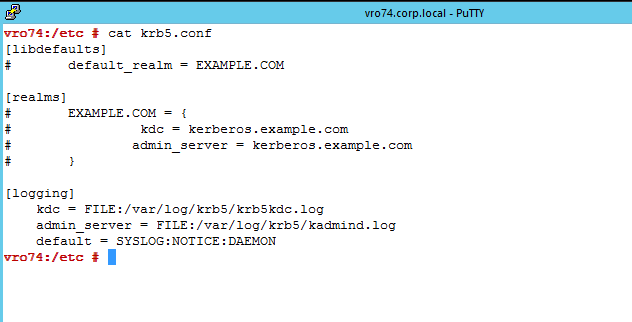
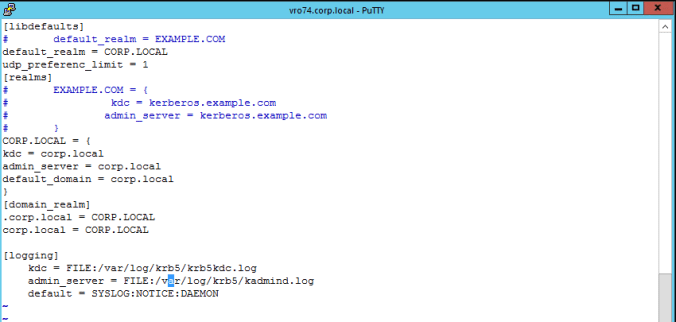
The file contents need to be changed to reflect the domain being used. For this environment we are using “corp.local” so we can change the file accordingly using “vi”. Our krb5.conf file now looks as follows:
The file needs to be owned by the root account and have 644 permissions applied to it. This “should” already be set but it’s worthwhile checking.

Without going into the intricacies of Linux file permissions, if your permissions look liek the above then you are good to go. If they don’t then you can set the ownership to root using “chown root:root /etc/krb5.conf” and the file permissions using “chmod 644 /etc/krb5.conf”.
Note if you have a vRO cluster or a vRA cluster using embedded vRO then you will need to make these changes on ALL appliances.
The final part of this step is to restart the appliance(s).
Step 8 – Adding The PowerShell Host to vRO
I’m not going to cover how to get into the vRO client etc. If you have come this far without knowing that then you can look it up!
The configuration workflow for adding a PowerShell host can be found in the workflow library as shown below.

As we are using SSL for connectivity we must use the port number that is listening for secure connections which is 5986 by default.

We are using WinRM so the PowerShell host type can be let alone (there are no other options currently). Our transport protocol is HTTPS and we want to add the PowerShell hosts SSL cert to our certificate store so we will accept all certificates. Finally our authentication mechanism is Kerberos.

Once submitted the workflow should complete successfully as shown below.

We now have a PowerShell host configured that we can use to execute cmdlets that target other remote servers.
Useful Links
https://docs.microsoft.com/en-us/windows/desktop/winrm/multi-hop-support
https://blogs.technet.microsoft.com/ashleymcglone/2016/08/30/powershell-remoting-kerberos-double-hop-solved-securely/
https://docs.microsoft.com/en-us/powershell/scripting/setup/ps-remoting-second-hop?view=powershell-6
