This article follows on from a previous micro-segmentation article (Part 1) and expands its use case a little bit further.
In part 1 we had a very simple 3 tier application with a single machine in each tier as shown in this diagram.

To help increase the scalability and availability of the application, our use case has now changed to accommodate multiple web servers in tier 1 of the application. It now looks like this.
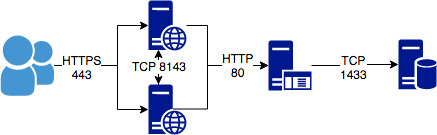
Not only do we have multiple web servers but also they communicate between themselves on a dedicated TCP port. Lets examine how this changes things before we go any further.
By adding another web server into each deployment and leveraging the existing NSX “Security Policy” configuration, we will not be able to provide the communications (TCP 8143) between the web server nodes. This is because the web tier policy we created in part 1 denies all intra-deployment communications between web nodes to prevent nodes across multiple deployments being able to talk to each other. So, this current policy helps to enforce the micro-segmentation requirement and also prevents us making the above configuration work.
To allow web tier nodes within a deployment (and only within a deployment) to talk between themselves , we need to create a new “Security Policy” that is applied before the web tier policy kicks in. However, if we do this then surely we will have the same issue with all web nodes being able to talk across multiple deployments on this dedicated TCP port? This is where NSX “On-Demand Security Groups” come into play.
Instead of using an existing “Security Group” we will automatically create a unique group each time the application is deployed and link the group to an existing “Security Policy” that defines our firewall rule to allow the intra-deployment communications to succeed. Lets see how this works in practice.
Adding a New Security Policy
The first thing we need to do is create a new “Security Policy” for our intra-deployment web tier communications on TCP 8143.
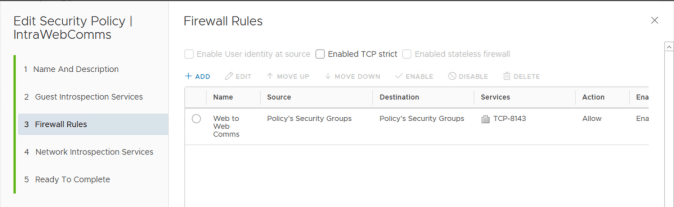
The source and destination for the policy are set to the group(s) that will be assigned to the policy. In other words, when the “On-Demand Security Group” is created per application deployment this new group will be used as both the source and destination for a firewall rule.
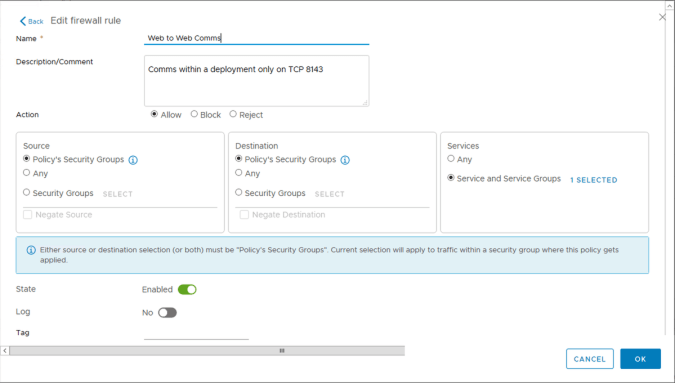
Finally we need to make sure that rules created by this “Security Policy” are applied and processed prior to those within the policy for the rest of the web tier. This is because we explicitly block ALL traffic between web tier machines to prevent cross deployment communications so we don’t want the TCP-8143 traffic to be stopped as well by the same policy. Our new policy has a higher weighting than the existing web tier policy.

Modifying the Blueprint
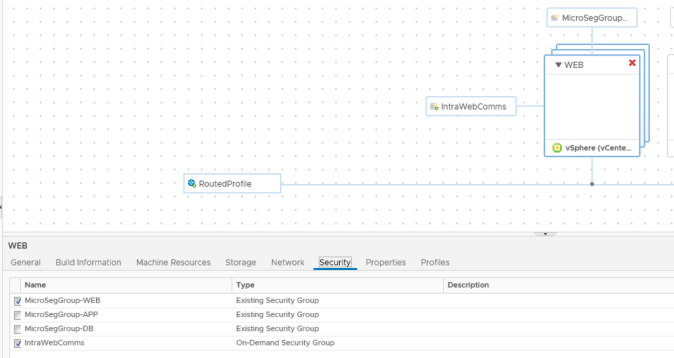
Now that our new “Security Policy” is in place we can modify our 3 tier blueprint to include an “On-Demand Security Group” which is specifically attached to the web tier of machines as well as increase the number of web tier machines a user can request.
To create a new “Security Group” per deployment we use the “On-Demand Security Group” option to create a new object on the blueprint canvas. In this case we have called it “IntraWebComms” so that it aligns with the “Security Policy” of the same name. The group is also linked to our new “Security Policy” so that when the group is created per deployment it will be automatically applied to the policy within “Security Composer”.
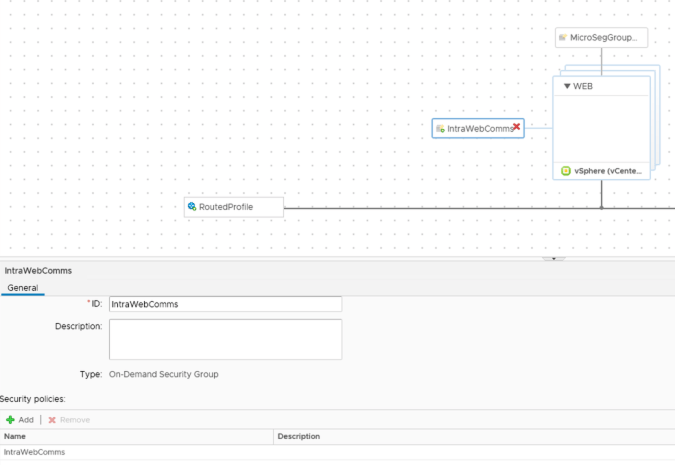
Our new “On-Demand Security Group” is linked to the web tier machines as shown below, completing our blueprint modifications.
The Result
Once the modified blueprint is deployed several times you can see the end result. Our rules for TCP 8143 communications between the web nodes appears at the top of the rule base. One rule per deployment is created for the TCP 8143 communications between web nodes of the same deployment. As each deployment has its own distinct rule, the first deployments web nodes cannot talk to the second deployments nodes on TCP 8143.

Part 3 of this series can be found here.

Pingback: vRealize Automation with NSX-V Micro-Segmentation (part 1) | vnuggets
Pingback: vRealize Automation with NSX-V Micro-Segmentation (part 3) | vnuggets