This article is as much a reminder for me as it is for you. Sometimes when you don’t cover a particular topic for a while it’s a good idea just to sit down and play with technology, especially when there are new product versions to consider.
The Scenario
The scenario for this article is as follows. We have a 3 tier application which multiple consumers want to deploy via self service provisioning, however the security department have mandated that we need to secure each copy of the deployed application from one another and from the rest of the environment. We have already deployed vRA 7.5 and NSX 6.4.3 and we will use these technologies for this scenario.
The basic communications of the application look as follows (I have deliberately simplified this and removed external service dependencies etc).

There are several approaches we could take for this. The first is to use NAT functionality leveraging “On-Demand NAT Networks” which will essentially allow vRA to deploy each copy of the application stack behind a unique NSX Edge device with NAT’ing enabled. The NAT rules would then control access in and out for the services behind the Edge device. This is regarded as a “traditional” approach.
The second approach is to do something a bit cleverer, leveraging micro-segmentation. Instead of deploying a new NSX Edge device for each copy of the 3-tier application, we allow all copies of the application stack to sit on routed networks and then control access to each of the tiers within the application (and between multiples copies of the application) via NSX firewall rules (using NSX policies, security groups, tags and application isolation).
Whether or not you use a unique new network for each deployment or utilise the same pre-provisioned network is up to you (consider providing sufficient IP space for a pre-provisioned network) however in this example we are going to use “On-Demand Routed Networks”.
Lets Get Started – NSX
The first thing to point out with this approach is that although vRA can automate NSX there are certain tasks that we must complete within the NSX admin console first. These include:
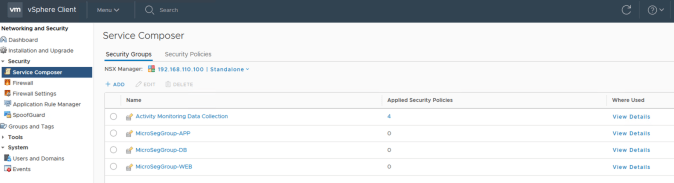
- Defining Security Groups (via “Service Composer” or “Groups and Tags”)
- Defining Security Policies (via “Service Composer”)
- Defining Security Tags – optional (via “Groups and Tags”)
This allows us to layout the reference communication rules for the application, defining the intra and inter application rules necessary to meet the use case requirements (remember that our networks are going to be freely routable so we need to control access to and from each part of the application).
As our example application has 3 tiers we want to ensure that each tier can only communicate with those machines that are required on the necessary ports and services, with everything else being restricted. The basis of any NSX firewall rules are “Security Groups” and since we have 3 tiers we will create 3 “Security Groups”.
Here you can see our 3 groups. They have no objects statically or dynamically added, just 3 empty groups at this stage.
Now we can start building out or “Security Policies”. In order to do this you need to know the services and ports your application requires for all tiers to allow the application to function AND be consumable. In our example we have the following requirements:
- User access to the web tier via HTTPS port 443
- Web tier to application tier via HTTP port 80
- Application tier to database tier via TCP 1433 (MS-SQL)
Everything else is not required (remember this is a simple example).
We will create 3 “Security Policies” in “Service Composer”, each controlling the access into a specific application tier and applied to the “Security Group” that represents that tier. For the web tier we allow user access via HTTPS into the tier and then block everything else (including communication between machines on the same tier).
The web tier rule set looks as follows.

The app and db policies are similar however they use different ports and restrict access to their opposing tiers as necessary.
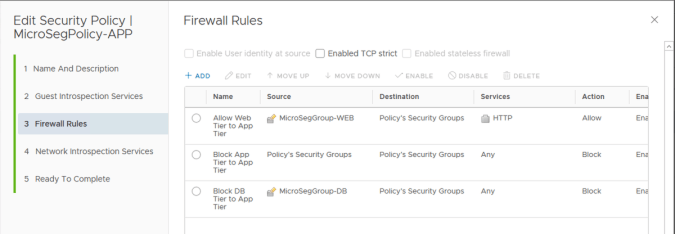

Once the policies are complete they need to be applied to the relevant “Security Groups” by selecting each policy in turn and using the “Apply” button (e.g. web policy is applied to web security group).

vRA Configuration
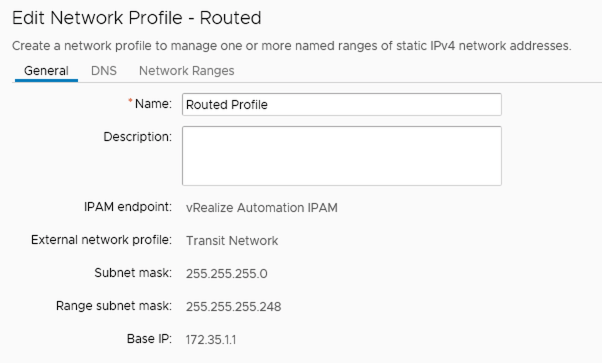
Now that the NSX components are in place we can concentrate on building the necessary configuration within vRA. The first thing we need are 2 network profiles (assuming none exists already).
- External Profile – this represents the NSX transit network (logical network that links internal logical routers to the perimeter edge gateway)
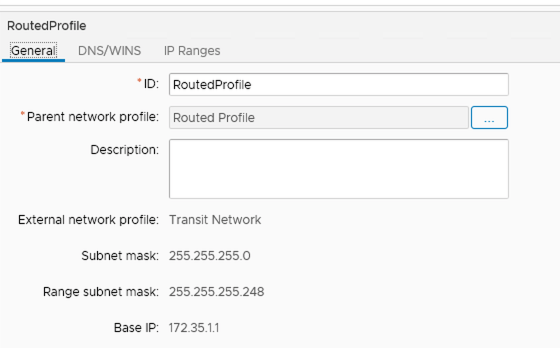
- Routed Profile – this represents the network ranges that could be assigned to each routable logical network
The External Profile includes the IP address of the perimeter edge gateway for routing purposes and a network range (only required if you are going to be using “On-Demand NAT Networks”).

The Routed Profile includes a list of network ranges that can be allocated for use by new logical networks (“On-Demand Routed Networks”) and a link to the External Profile.
Note: The transit network profile and transit logical network need to be selected in all reservations you want to deploy on-demand networking into. You also need to select a DLR and link it to the transit network profile. Failing to do this will result in deployment failures.
Now that we have the pre-requisite profiles in place we can start building out the application blueprint in the “Blueprint Designer”. Our simple application will only have one machine in each tier and all the machines will be on the same network segment so we start with creating 3 machine specs and an “On-Demand Network”.
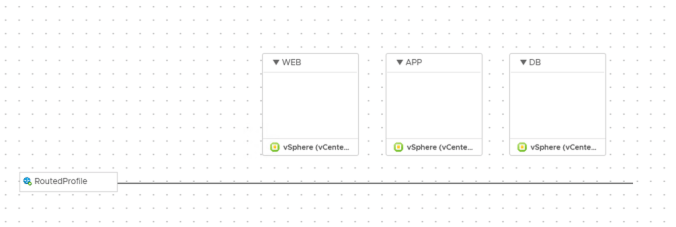
Our “On-Demand Routed Network” is linked to the Routed Profile we created above.
Each machine spec is linked to the “On-Demand Network” by editing the VM spec network configuration.

To ensure each tier is firewalled correctly we drag 3 existing security group objects onto the canvas and link each one to the correct tier “Security Group” we created in NSX earlier. This will explicitly put each new machine in the respective “Security Group”. Note that we could also create “Security Tags” within NSX and use them on the canvas instead of the “Security Groups”. Each group would then need a dynamic membership setting within NSX.
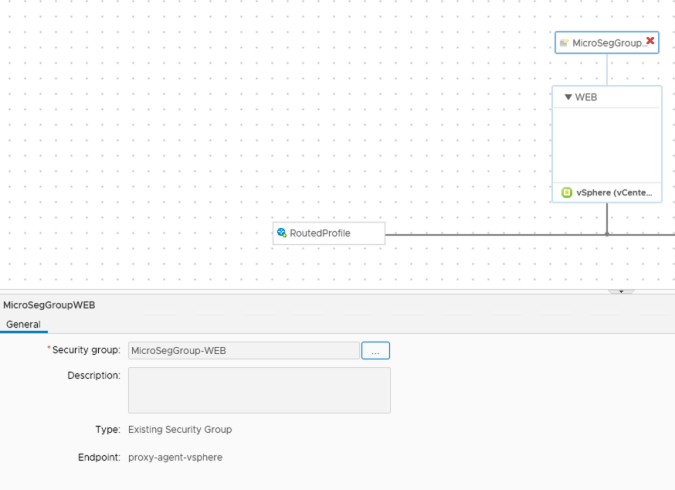
The link between each VM spec and the relevant “Security Group” is set by selecting the VM spec and then choosing the “Security Group” from the “Security” tab.
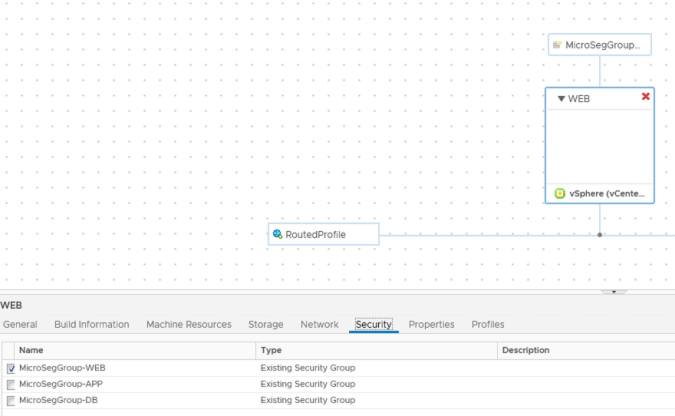
Once completed across all tiers we end up with a blueprint that looks as follows.

The final step is to enable application isolation on the blueprint as a whole. This will block anything in or out of the application that we have not explicitly allowed when setting up the “Security Policy” configurations.

The blueprint can now be published and entitled as per any other blueprint.
Deploying the Application
Once the blueprint has been entitled and is available as a catalog item it can be requested by an end user. The various on-demand components will be deployed and configured together with the amendments to each “Security Group” as shown below.

All parts should be listed as successful on the “Deployments” tab.

The NSX Firewall rules should contain 4 new sections, one for each tier (these will not change for each new deployment of the 3 tier application as only the security group memberships will be altered) and one section for the isolation policy.
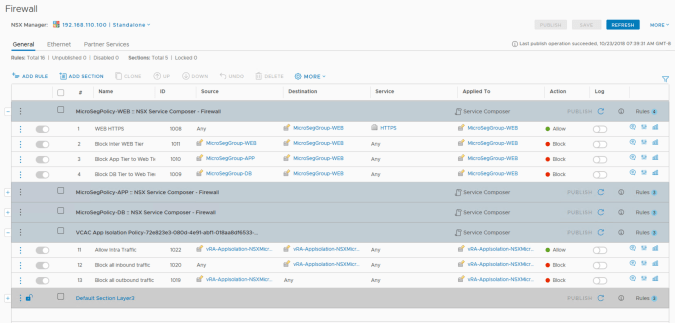
The isolation policy rules will change every time a new deployment is carried out or an existing deployment removed. In this example a second deployment via vRA of the same application has been carried out. A new intra communication rule has been added for the new deployment and the existing inbound and outbound blocking rules have been amended to include the auto-created “Security Group” for the new deployment.

Hopefully this gives you an idea on what can be done. The next posts in this series can be found here.

Pingback: vRealize Automation with NSX-V Micro-Segmentation (part 2) | vnuggets
Pingback: vRealize Automation with NSX-V Micro-Segmentation (part 3) | vnuggets