In this article I am going to cover an issue one of my customers was facing with their vRA 7.5 platform with regards to appliance hostnames and how we went about solving it.
The Back Story
The vRA 7.5 stack had been deployed (no vRSLCM) using the out of the box GUI installer based on a medium distributed reference architecture and although the environment deployed without errors there was an anomally with the directory configuration. Only one connector was showing up, with node 2’s connector being MIA.
Logs from the connector logfile on the second node revealed an interesting message.
019-05-10T15:41:56,766 ERROR (resourceSyncTaskExecutor-1) [;;;] com.vmware.horizon.connector.admin.ObjectPushEngine – Exception in REST call. Error code: 400 : Error body: {“errors”:[{“code”:”form.invalid.host”,”message”:”Host is not valid. It has to be a valid fully qualified domain name (FQDN) or an IPv4 address.”,”parameters”:null}]}
Going back and looking at the hostname configuration revealed that both vRA hosts had been deployed with short hostnames rather than FQDN’s.
The following KB article backed up the log file message and actually states that vIDM connectors are not compatible with short hostnames.
https://kb.vmware.com/s/article/2150196
Looks like we are going to have to rename all the appliances!
Preparation
Changing a hostname of a deployed vRA appliance (or appliances!) is not a one click change. There are multiple steps that have to be completed and everything has to be done in the right order and at that right time. Failure to do this can result in a downed platform.
You will need a new SSL certificate for the appliances you are changing the hostnames for unless you are using a wildcard certificate or the certificate already has the new hostnames as SAN entries. If you are using a self-signed cert then it can be re-generated in the VAMI post update. If you are using a CA signed certificate then generate a new certificate now so that you have everything ready.
SNAPSHOT EVERYTHING PRIOR TO STARTING!!!
There are several documented processes on the VMware documentation site depending on what version of vRA you are using. In this case it was vRA 7.5 which has the same process as 7.4 and 7.6 (https://docs.vmware.com/en/vRealize-Automation/7.5/com.vmware.vra.install.upgrade.doc/GUID-E75E76B2-8883-4608-9484-6C04001D5FEB.html) however this process is known to have some issues and at the bottom of the article it states you can use the 7.3 process if you experience any issues. To save any wasted attempts I elected to just use the 7.3 process from the start (https://docs.vmware.com/en/vRealize-Automation/7.3/com.vmware.vra.install.upgrade.doc/GUID-A0B3056D-662B-4AA2-BD10-073252E40F22.html).
There are a couple of steps that this article does not cover so I’m going to take you through the process to show you what’s involved and what you will see.
Step 1
Create a DNS record for the new hostname(s). In my customers case the DNS record already existed as we were just using a shortname but for a complete hostname change a new DNS record is required. The old DNS record(s) should NOT be deleted yet.
Step 2
Validate that the appliance (or appliances) is/are working as they should be. All services should up and registered and the portal should be functional. If there issues then they should be resolved first before making hostname changes.
Step 3
Login to the VAMI interface of the appliance you are changing the hostname on. If you are planning to change all hostnames on a clustered platform then you should start with the MASTER appliance first.
Follow this process for ONE NODE AT A TIME!! DO NOT DO ALL NODES AT THE SAME TIME!!
Step 4
Go to the “Network” tab and select “Address”. Update the hostname field to the new hostname. DO NOT RESTART THE APPLIANCE!

Step 5
Login via SSH to the appliance and verify the hostname has changed.

Step 6
Run the “change-hostname.sh” script file in the following location.
/usr/lib/vcac/tools/change-hostname/change-hostname.sh OLD_HOSTNAME NEW_HOSTNAME
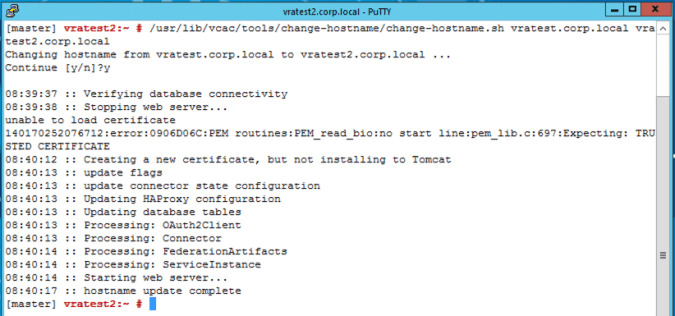
You may see varying XML errors displayed in the results of the above command. This will normally be seen if you have a directory already configured within the installation. You can ignore any errors that are seen (in the worst case you may need to re-create the directory configuration POST rename).
Step 7
If you have updated the MASTER appliance hostname then the haProxy configuration on all replica hosts needs to be updated so that it references the updated MASTER appliance with its new hostname (if this is a single node deployment then you can skip this step). If you are updating the hostname of a replica node then the haProxy configuration needs to be updated on the MASTER appliance and any other replica appliances.
To update haProxy on a node log into it via SSH as root and run a search and replace using the old and new hostnames.
sed -i “s/OLD_HOSTNAME/NEW_HOSTNAME/g” “/etc/haproxy/conf.d/10-psql.cfg ” “/etc/haproxy/conf.d/20-vcac.cfg”
Step 8
Return to the VAMI interface and “vRA -> Messaging” tab to reset RabbitMQ or the RabbitMQ cluster depending on whether the install is a single appliance or a clustered deployment. Note it is important that you login to the VAMI interface using the new hostname. If you use the old hostname then some of the fields in the VAMI interface will not populate or return values.
In my example I am using a single vRA appliance so I am performing a “Reset RabbitMQ”. The reset process can take some time as it is restarting vRA services in the background so be patient and do not do anything else whilst this process is running.

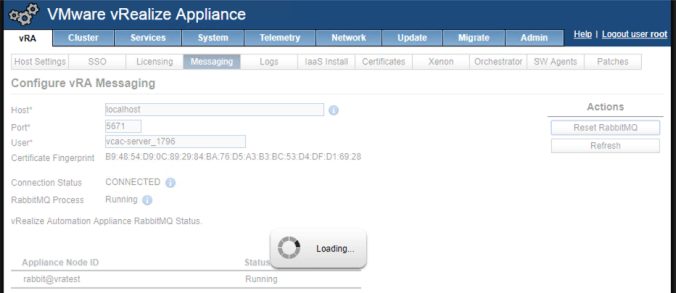
The change of hostname will be reflected in the table at the bottom of the screen. Note that RabbitMQ using short names by default so do not expect this to be fully qualified.

Although the interface reports the operation is complete services will still be restarting in the background. Monitor the /var/log/vmware/vcac/catalina.out file to follow the service restart process (note the services will probably nto display in the VAMI interface at this point).
Step 9
Restart the MASTER appliance. Wait for it to come up and all services to be REGISTERED and then restart each replica in the cluster (if you have any) one at a time. Wait for each restarted replica to come back up fully (services REGISTERED) before restarting the next.
Step 10
Update the SSL certificate for vRA (not web or manager) with a certificate that contains the new hostname(s) using the “vRA -> Certificates” tab on the MASTER appliance. In this example I am replacing the self-signed certificate.


Step 11
Update the load balancer configuration (if you are using one) with the new target hostname of the updated appliance.
Step 12
Login to the portal and verify that all connectors are showing, they have the corret hostname and if you have an existing directory configured verify that directory sync operations still work.
In this example single node environment you can see the hostname of the connector now reflects the updated appliance hostname.

Step 13
If you experience any issues with directory synchronisation with errors reporting that the hostname does not match the certificate common name then you will need to regenerate the connector certificate for the relevant node.
To generate a new connector certificate SSH to the appliance with root and run the following script file.
/usr/local/horizon/scripts/secure/wizardssl.hzn

