In my previous article I covered getting a very basic setup running between a Linux (CentOS 7) Ansible server and a Windows 2016 server. In almost all instances this configuration should never be used in a production environment, it is just simply too insecure!
In this article I am going to explore how to apply a more security conscious configuration using client certificates.
Options
Before we get down to configuration files it’s worth spending a couple of minutes exploring the options that are available at a high level.
Firstly you can secure the communications channel between the Ansible server and Windows 2016 server by leveraging HTTPS. This will involve creating and installing an SSL certificate on the Windows 2016 machine.
Secondly you can use an authentication option (NTLM, Kerberos or CredSSP) that will encrypt the message payload before it is sent to the Windows server.
Combining both of the above methods can also be done however generally payload encryption is not performed if leveraging TLS 1.2 and NTLM, Kerberos or CredSSP as the TLS protocol is regarded as being more secure.
Not all authentication options are valid for a given environment. Ansible has a useful table on their website which covers when you can and can’t use each option which I have copied here (the original is located at https://docs.ansible.com/ansible/latest/user_guide/windows_winrm.html#winrm-encryption).
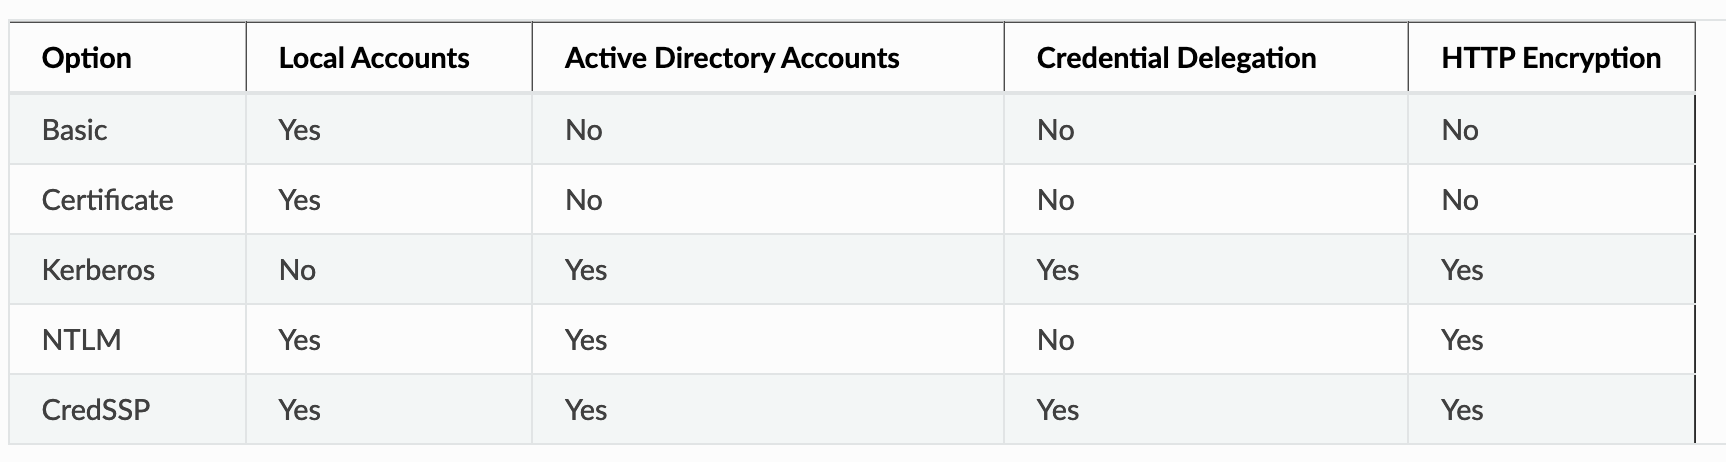
Here you can see if I were to use “Certificate” based authentication (i.e. a similar method to the one I implemented for my Linux servers via SSH) then I would only be able to map that certificate to a local Windows user, not be able to use delegation and would not be able to encrypt the message payloads in the communication between Ansible and a Windows machine. This is fine for my environment as my Windows servers are standalone and I have no need for delegation.
Lets implement Certificate Authentication and see what happens.
Certificate Authentication Overview
Before we get stuck into configuration lets go over how this method of authentication actually works.
The client (i.e. Ansible server) owns a client certificate comprised of 2 parts (public and private keys). The certificate represents a user through the population of the certificate attributes. The keys BOTH exist on the Ansible machine so it can prove to the Windows server that not only does it have a client certificate it can also encode and decode with it. If this weren’t the case then a malicious user could copy a public key from another server in an attempt to impersonate a valid user. Having both keys helps prove that you own the certificate.
The public key of the client certificate (and its issuing authority) are trusted by the Windows server and a user mapping created in “winrm” against the issuing authority thumbprint combined with the certificate subject that points to a set of credentials.
Simple, now lets implement this!
Generating a Client Certificate for Ansible
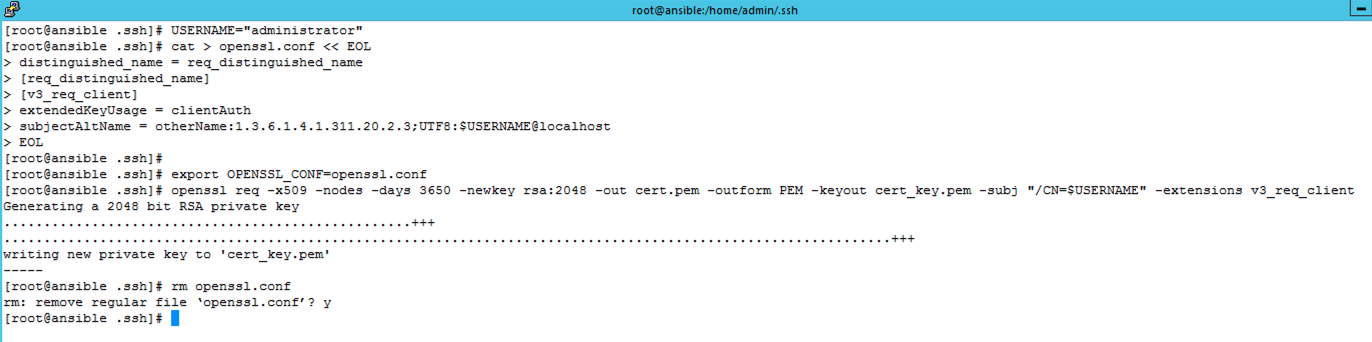
First of all I need a Client Certificate for the Ansible server. I’m going to use OpenSSL to create a self-signed certificate (alternatively you could import a CA signed public and private key rather than use this process for self-signed). The following is copied directly from the Ansible website and creates a certificate request configuration file for the client certificate that contains the username in UPN format as a SAN entry. The file is then used to make a request for a self-signed certificate which outputs the public and private keys.
# Set the name of the local user that will have the key mapped to
USERNAME="username"

cat > openssl.conf << EOL
distinguished_name = req_distinguished_name
[req_distinguished_name]
[v3_req_client]
extendedKeyUsage = clientAuth
subjectAltName = otherName:1.3.6.1.4.1.311.20.2.3;UTF8:$USERNAME@localhost
EOL

export OPENSSL_CONF=openssl.conf
openssl req -x509 -nodes -days 3650 -newkey rsa:2048 -out cert.pem -outform PEM -keyout cert_key.pem -subj "/CN=$USERNAME" -extensions v3_req_client
rm openssl.conf
This is how it looks on my Ansible server. I have chosen to output the keys to my admin users ssh directory.
The next step is to place the public key onto my Windows 2016 server. To do this I use WinSCP to secure copy the file to the servers desktop. The certificate can then be imported using the “certificates” MMC snapin into the “Trusted People” store as well the “Trusted Root Certification Authorities” store (as this is a self-signed certificate).
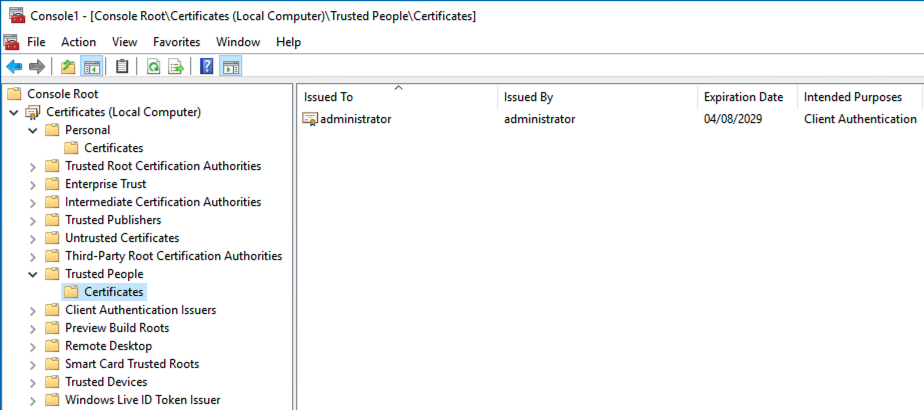
If you want to use a CA signed certificate rather than the self-signed certificate then the certificate itself should be placed into the “Trusted People” store and the CA issuing certificate placed into the “Trusted Root Certification Authorities” store.
HTTPS WinRM Listener
In order to use certificate authentication WinRM needs to be configured to use a channel encrypted via HTTPS using a HTTPS Listener (using HTTP is not an option). This requires installing an SSL certificate on the Windows server which is linked to the HTTPS Listener enabling it to leverage encrypted communications between client and server.
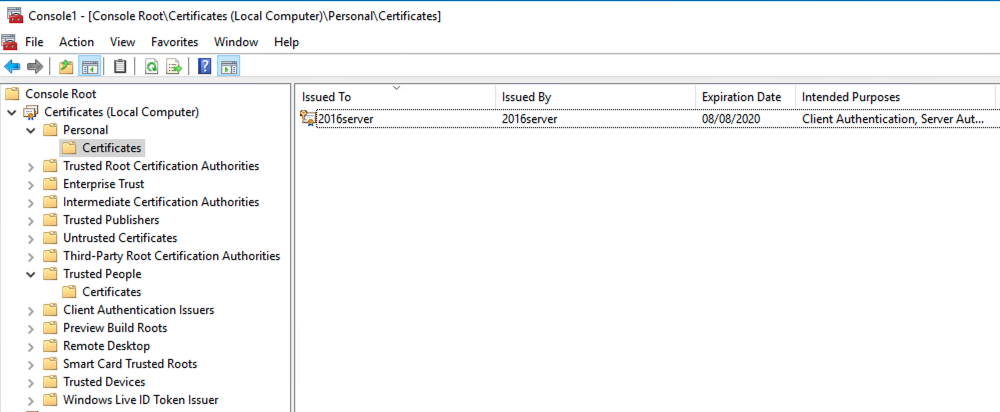
In my environment I have no enterprise CA so I am going to generate a self-signed certificate and install it to the Local Machines personnel store. My 2016 server does not have IIS installed on it so I am going to create this certificate via PowerShell using the “New-SelfSignedCertificate” cmdlet.

The result is a new certificate added to the “Personnel” store. This can now be used when configuring a HTTPS Listener.
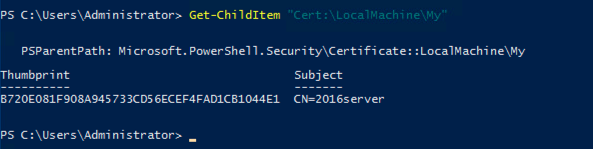
The first step to create the Listener is to make a note of the certificate thumbprint so that we can use it for the Listener. This can be done in PowerShell by listing all the certificates in the personnel store which will also show the thumbprints.
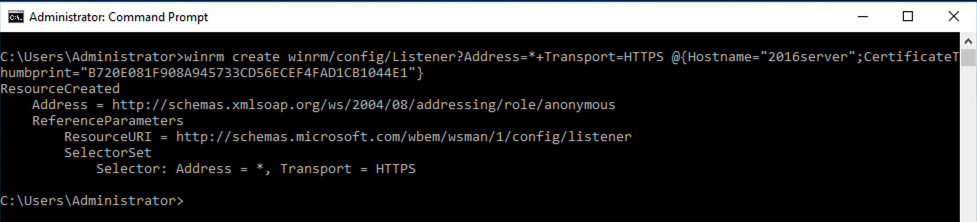
Next the listener is created using winrm. I choose to use a standard command prompt for this rather than PowerShell as the syntax is slightly easier. My copied thumbprint value from the above output is added to the command.
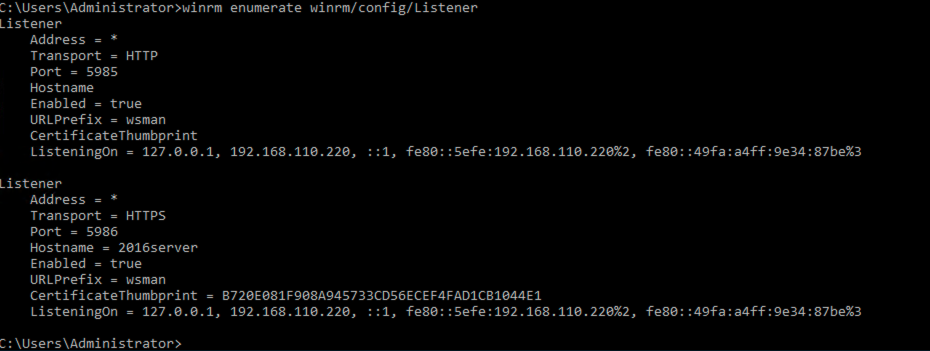
Listing the configuration now shows a configured HTTPS Listener.
Mapping a User
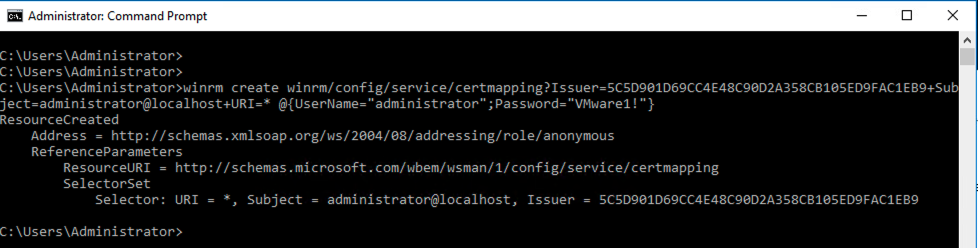
Once the Listener is in place I then need to tell WinRM which user to map the certificate to. In reality what I am doing is mapping an expected SAN entry value (i.e. the username in the client certificate SAN attribute) and the thumbprint of a trusted issuing authority (i.e. the authority that needs to have signed the client certificate) to a set of credentials on the windows server.
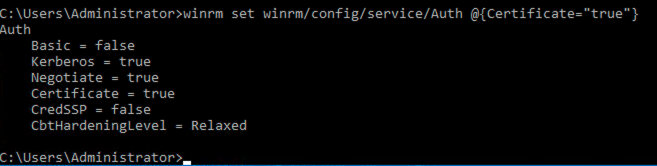
Enabling Certificate Authentication Option
Despite having a certificate installed and a user mapping I still need to tell WinRM that it can use certificates to authenticate users. To do this I need to set the certificate option from false to true and disable “Basic” authentication if it is still enabled (here I have already disabled it but you can use the same method to disable it if needed).
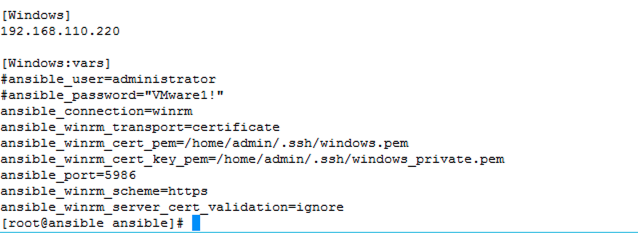
Ansible Variables
The last piece of the puzzle is to add the necessary variables to Ansible so that it knows how to communicate with the Windows 2016 server. I have commented out the user and password variables I was using for basic authentication, changed the transport method to certificate, added the public and private keys to the client certificate, modified the port number to match the HTTPS Listener port, set the scheme to HTTPS from HTTP and finally added a variable to ignore any certificate validation errors (as I’m using self-signed certificates).
Now I can run a new test ping to verify I can still authenticate to the Windows 2016 server. Note that the user in the debug output displays as “admin” however this is just because “admin” is defined as the default user for remote connections.
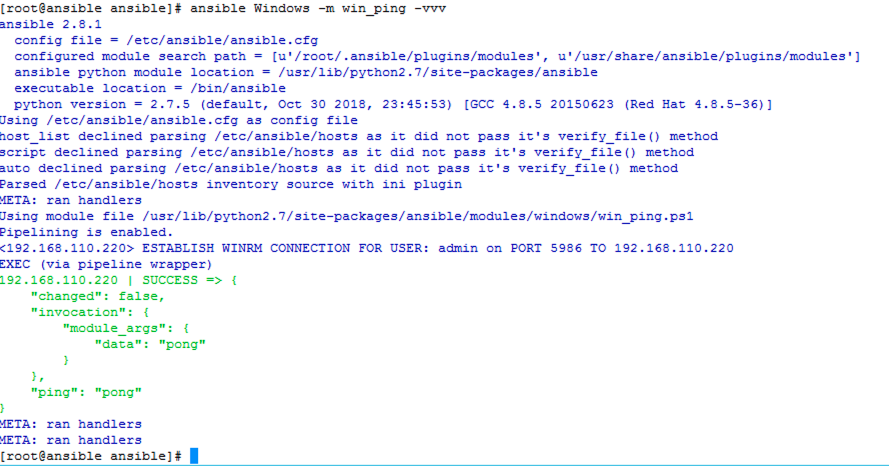
The ping proves connectivity is functioning between Ansible and Windows using a client certificate allowing Ansible to be implemented in a more production orientated environment without fear of open security issues.

Pingback: Resolved: Connection Timeout between Ansible and Windows Server - Resolved Problem