This article will walk you through getting the latest version of the “Management Pack for vROPs” installed and working, and get you on your journey to expanding out the functionality within vRealize Operations.
What Is It?
The management pack is a software update for vROPs that does several things including:
- Allowing visibility into vRO so you can see what the orchestration platform is doing (think dashboards of workflows executions, top 10 executions and all the other useful overview widgets).
- Providing a mechanism to perform vROPs actions against objects within the vROPs inventory which are based on workflows within vRO.
- Automatically running remediation actions against vROPs inventory objects from triggered alerts using vRO workflows.
The management pack opens up all manner of possibilities for automating the datacenter and providing self healing capabilities. If you have a common issue whose resolution can be coded into a workflow AND you know how to detect the issue in the first place then you can set vROPs up to execute the resolution for you.
Where to Start
Before we get into any of the cool stuff, the pack has to be first installed into vROPs. I like to use vRSLCM for the management of all vRealize suite products so this is the method I will demonstrate here (if you wish to install directly then you can also do that).
The management pack downloads are hosted on the “VMware Marketplace” which is linked into vRSLCM as shown below. You can search for a pack using the filter option and download one or more packs directly to vRSLCM (assuming you allow vRSLCM to access the internet).
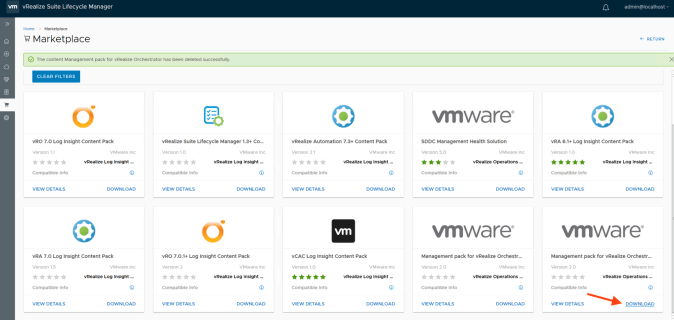
Once the download has been completed you can run the install from the “Download” tab.

You will be prompted to provide the datacenter and vROPs environment from your vRSLCM configuration. The “Install” button will kick off a process that transfer the management pack to the vROPs master node and kicks off the install.
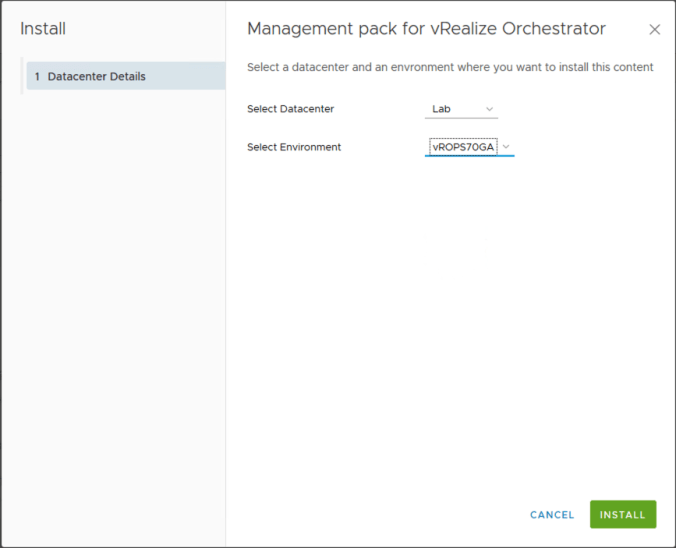
You can track the install process from the “Requests” page in vRSLCM or from the admin page of vROPs.
Basic Configuration
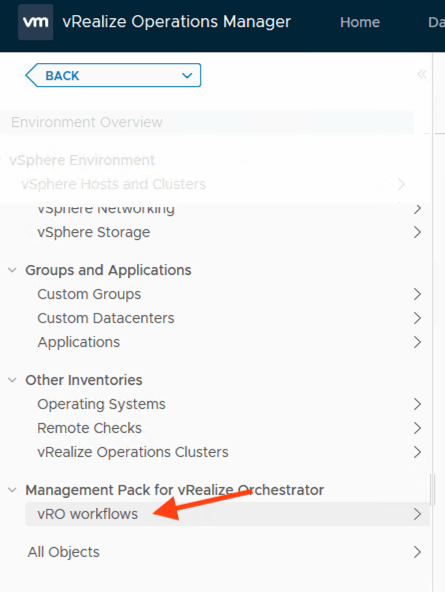
Once the configuration has completed we need to perform some basic configuration. The first step is to configure our new solution adapter in vROPs just like we would do for any other management pack.
Play special attention to port numbers as these will differ depending on whether you are hooking up to an embedded (8281) or external (443) vRO instance. In this example I am using an embedded instance.

If the connection tests OK and you are happy with the select collector (see “Advanced Settings”) then the configuration can be saved. If there are more vRO instances then the above process can be repeated for each one.
If the connection is Ok then data should start to be received from each vRO instance.

Configuring vRO
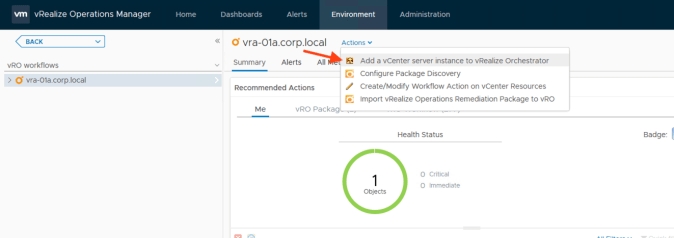
Each vRO instance hooked into vROPs needs to be configured for the vCenters it will be automating. In other words, if you are going to be using vRO1 for automating machines that reside in vCenter1 then vCenter1 needs to be added as an endpoint within vRO. This can be done in one of two ways.
The first method is to drive the vCenter addition to vRO from within vROPs, using the “Actions” menu on the vRO server inventory object.
The details that you provide to run the action will be unique to your environment. The vCenter should be selectable from the drop down list and the path will be pre-populated however all other details will need to be provided. In this example the PBM and SBM URL’s are:
https://vcsa-01a.corp.local:443/pbm
https://vcsa-01a.corp.local:443/sms/sdk
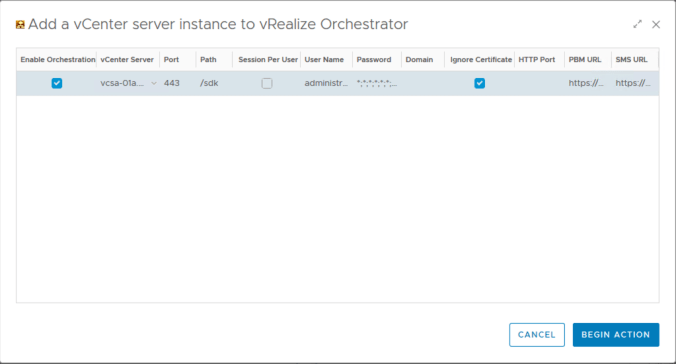
Once the action has begun it can be tracked by either the “Recent Tasks” section under “History” on the “Administration” page in vROPs OR by checking the relevant workflow in vRO (“Add a vCenter Server Instance”).

If you are more comfortable working in vRO then all of the above can be accomplished by logging directly into vRO and executing the “Add a vCenter Server Instance” workflow. The SBM and PBM URLs will be auto-completed for you if you choose to use this method 🙂
Note if you use this second method then you will most likely need to wait a vROPs data collection cycle to vRO before proceeding any further.
Executing Actions
After data collection has completed the workflows which are contained within the default vRO packages (“com.vmware.vrops.oob_content” and “com.vmware.library.vcenter”) will appears as actions on the relevant inventory objects within vROPs.
Actions whose icons have a yellow background (i.e. like “Migrate VM” in the screenshot below) are backed by vRO workflows and configured by default as part of the management pack install.
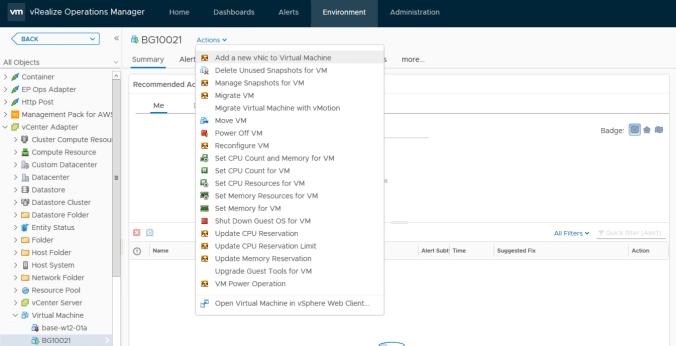
These actions can be executed like any of the other OOTB actions and may require additional inputs depending on the inputs of the backing workflows.

Linking vRO Workflows to Alerts
The next step on the automated datacenter journey is to start to link your workflows to remediation configurations within alert definitions. For example, here we have created a copy of an OOTB alert definition triggered when a VM has long I/O wait times (this is just an example only).

When this alert triggers we may want the user to have a recommendation presented that allows them to initiate a VM migration to a different host server that is less busy (yes I know vROPs would be doing this automatically but it’s just an example). To do this we would create a new recommendation and use the vRO adapter to select the workflow we want to execute, in this case “Migrate VM”.

Now when the alert is triggered a recommendation will present the user with an option of running the vRO workflow to fix the issue. The same process can be applied to any situation, alert and workflow.
Automating the Workflow Remediation
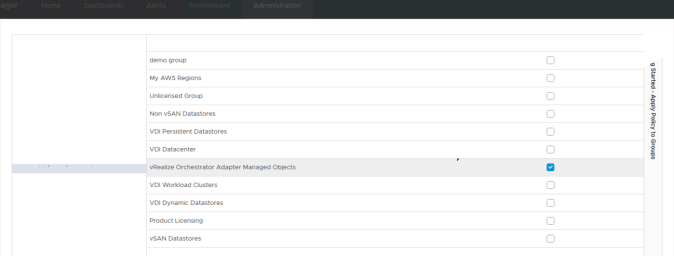
This process is mostly the same as automating any other action however before we do that we need to associate the vROPs policy that will contain the alert definition we have customised to the “vRealize Orchestrator Adapter Managed Objects” custom group. This custom group is automatically created by the management pack installation. In this example we are using the “vSphere Solutions Default Policy” policy that applies to all vCenter objects.
Lastly we can enable the automation for the alert definition.
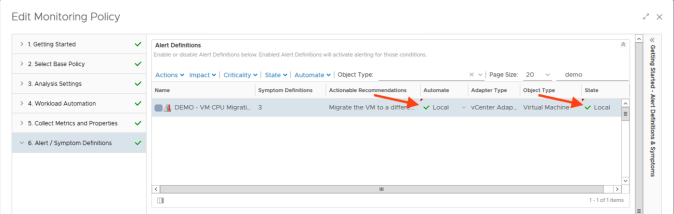
Next time VM object that is covered by this policy experiences conditions that match the alert definition the response will be automated by vROPs without any user interaction.
