This article is probably late coming but I thought it was still worthwhile to write given that a large number of customers are still on early 7.x releases (some on 6.2.x) of vRA and unlikely to be moving to 8.x any time in the immediate future. For those customers it is possible to move to a more recent version of 7.x to maintain product support.
I’m going to cover the process of performing a vRealize Automation side-by-side migration which is generally used when:
- the source environment cannot be modified to ensure quick rollback (or possibly due to change control etc.)
- there is not an easy in-place upgrade path to the chosen target version
- you need to move an entire environment and its contents
- the migration process needs to be proven first without impacting users
It’s import to understand that a side-by-side migration does not do everything for you. You as the admin still need to do a fair bit of work to get to the point of hitting the migration button but once you are there you can re-run the process as many times as you want in order to test/try to your hearts content until you feel comfortable with the process.
High Level Steps
The migration has many stages so this process flow should give you an understanding of what needs to happen and the order it needs to happen in (remember this flow is high level, there are other smaller steps that I will also cover).

Seems pretty simple right? Well it’s a bit more involved but it’s definitely not rocket science!
1 – Deploy Target vRA
I’m not going to insult your intelligence by showing you how to install vRA. All I will say is check the 7.x documentation to see what versions you can use the migration tool with (e.g. to get to 7.6 from 7.0x you need to migrate to 7.5 first and then do an in-place upgrade to 7.6) and make sure your root passwords are the same across all target appliances if using a HA architecture.
In addition, you should NOT configure your endpoints within vRA but you SHOULD deploy and configure any vCenter agents required during the install process, re-using the same agent names and endpoint names as the source environment. You can verify each agent name by checking in the “VRM.Agent.exe.config” files on your source proxy agent server(s) (serviceConfiguration tag). The endpoint name is not located in these files but can be seen when performing a “GET” on the agent config file (see example screenshot below).
All vSphere proxy agents that are deployed need to have their configurations set to prevent VM deletions upon failure. Normally the default configuration would trigger the deletion of a workload should a terminal error be encountered during provisioning however it also fires in the case of migrations if failures are encountered as machines are processed. You do not want your workloads to be deleted when testing the migration process of vRA! To apply this configuration you need to do the following on each agent, adjusting the path and agent name as necessary.
c:\Program Files (x86)\VMware\vCAC\Agents\INSERT_AGENT_NAME\DynamicOps.Vrm.VRMencrypt.exe VRMAgent.exe.config set doDeletes false
Here I have used the “GET” version of the command to verify existing configuration (you can see the endpoint name here) and to verify my change has been applied.

2 – Target Load Balancing
If you are migrating to a highly available target (i.e. multiple vRA appliances under a load balancer) then the load balancer needs to be configured so that all traffic goes to the master vRA node AND health monitors are disabled for ALL of the load balanced services. Before you do this it is a good idea to prove your load balancer does actually work with all pool members and its configured health monitors to save troubleshooting POST migration.
In addition, timeout settings for all of the vRA services on the load balancer should be lengthened (10+ minutes) to prevent any session timeouts occurring during the migration process.
3 – Target Tenants
A common miss-conception is that the migration process takes everything over from the source. Whilst this is somewhat true from a database perspective, the basic tenant constructs still need to be put in place prior to migration. This means you need to create EVERY source tenant on the target (same name, case and URL). In addition you need a local Tenant Admin creating for each tenant so that you can login to perform directory configuration (yes you need to do that as well!).
If there is old configuration data (tenants, directories etc.) that you do not want to migrate then it must be deleted from the source environment prior to migration.
If you do not create any part of the required tenant/directory configuration on the target it will cause an issue during the migration.
4 – Target Directories
As per the above section, directories need to be configured as per the source environment and synced successfully.
If you are coming from a pre 7.x environment then all Tenant Admins and IaaS Admins from the source should be added to the target environment.
5 – Info Gathering
Before you can migrate anything there are some information that you must retrieve (and a few checks required) from the source that we haven’t already covered so far. This includes:
- Source root password(s)
- Source hostnames (appliance, IaaS, SQL etc.)
- IaaS DB encryption key
- Tenant Admin and IaaS admin names (pre 7.x only)
- administrator@vsphere.local password for target vRA
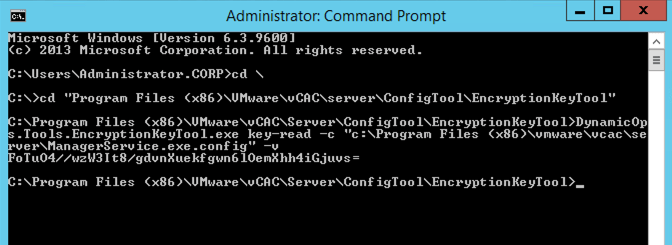
To fetch the IaaS DB encryption key a command needs to be run on the active “Manager” VM or the VM hosting the active manager role.
"C:\Program Files (x86)\VMware\vCAC\Server\ConfigTool\EncryptionKeyTool\DynamicOps.Tools.EncryptionKeyTool.exe" key-read -c "C:\Program Files (x86)\VMware\vCAC\Server\ManagerService.exe.config" -v
The output of the command will look similar to the following.
6 – Software Agent Upgrade
If you are using the Software Agent on the source environment AND you are migrating from vRA version 7.1 or 7.3 then you should apply a hotfix to the source environment prior to performing the migration (note there is no patch for 7.0x). The details of the hotfix can be found at the following link:
https://kb.vmware.com/s/article/52897
If this hotfix is not applied than any deployed software agents in the source environment will not be upgraded to work with TLS1.2 and therefore will not function. It is recommended to snapshot your source environment before making any changes although the procedure does allow for rollback without leveraging snapshots.
My source vRA install is 7.01 so I won’t be deploying any hotfix here.
7 – SQL Records Update
The migration process requires that any entries in the dbo.VirtualMachineTemplate SQL table have a memory allocation setting of at least 4MB. To verify this you can run the following queries in studio manager to find and update any records required (or you can manually open the table for editing, scan the records and amend the cells as appropriate).
select VirtualMachineTemplate set MemoryMB = 4 where IsHidden = 0 and MemoryMB < 4;

update [vCAC].[dbo].[VirtualMachineTemplate] set MemoryMB = 4 where IsHidden = 0 and MemoryMB < 4;
8 – Cleanup Source Postgres DB (Optional)
The source Postgres database contains all manner of information including telemetry bundles, logs and application objects. If these are sufficiently large it may have an adverse effect on the migration process and performance causing it to stall or fail. To reduce the likelihood of this happening you can run the following commands on the database to purge any large objects.
This is not a mandatory step however it is something you may want to do if you encounter issues during the migration process.
Note that for a replicated database these commands MUST be run on the MASTER appliance with replication in Async mode.
su - postgres -c "/opt/vmware/vpostgres/current/bin/vacuumlo -v -p 5432 vcac"

su - postgres -c "/opt/vmware/vpostgres/current/bin/vacuumdb -f -p 5432 -t pg_largeobject -t pg_largeobject_metadata vcac"

su - postgres
psql -d vcac
vacuum full;
vacuum analyze;
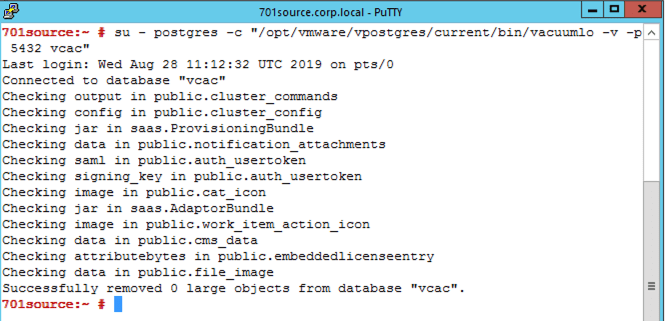

Note that the output of the vacuum commands may differ to that shown in the screenshot below depending on what needs removing from the database. In this example my database has already been cleaned previously.

9 – Database Migration Directory
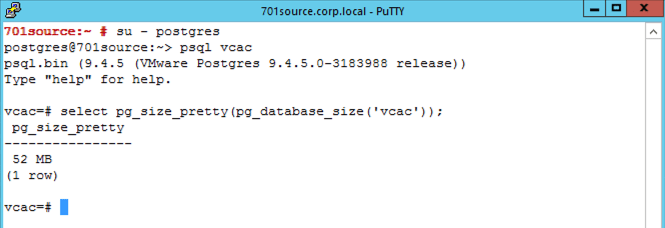
By default the database migration files are output to /storage (i.e. the root partition) so it is worth checking you have sufficient space on that partition to hold twice the size of the Postgres database. You can get the current database size by using the following commands.
su - postgres
psql vcac
select pg_size_pretty(pg_database_size('vcac'));
In my environment the database is small as it’s a fresh install for the purposes of this article. You should expect this to be considerably larger in a production environment that has a decent rate of change.
It may be worth creating a separate directory on the MASTER source appliance in a location that has more free space. For this article I have created “/storage/db/mig_backup” as “storage/db” has much more free space.
10 – Snapshot Target Environment
Taking a snapshot of the target environment ensures you can re-try the migration process over and over again without having to re-deploy the vRA stack. This is a VERY IMPORTANT STEP as it may take one or two attempts to iron out any process bugs. For this reason you should also ensure your target environment is “working” normally (as far as you can do without any endpoints defined) before the snapshot is taken as reverting to a non-functioning platform is pointless.
If your database is not on an IaaS machine (chances are it won’t be if it’s a production install) then you should also take a full database backup of the target SQL database just in case.
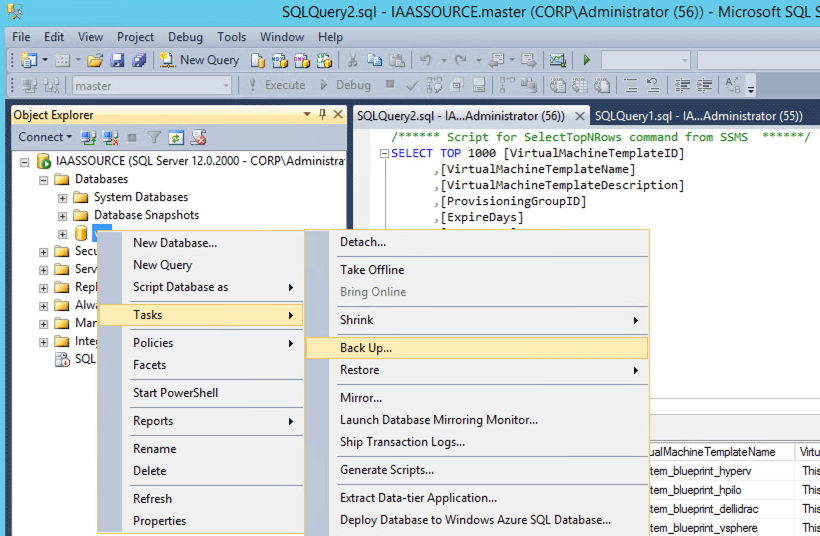
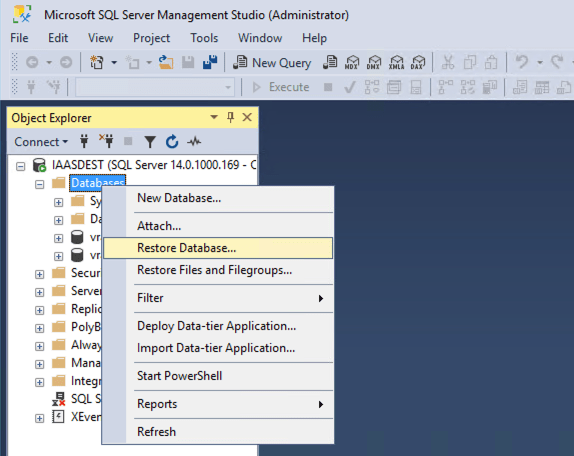
11 – IaaS SQL DB Backup & Restore
You can use a variety of tools to perform this step however the basic requirement is to take a full database backup from the source SQL environment that can be used to restore onto the target SQL platform.
If you are performing the actual migration (i.e. you have already run a test migration and now you are repeating the process for the final migration and cut-over) then there should be no changes happening to the source environment (i.e. no users deploying or modifying anything) from this point onwards until the migration is complete. This is to ensure everything is captured and migrated to the target vRA stack.
In this example I am using SQL Studio Manager to take the backup.

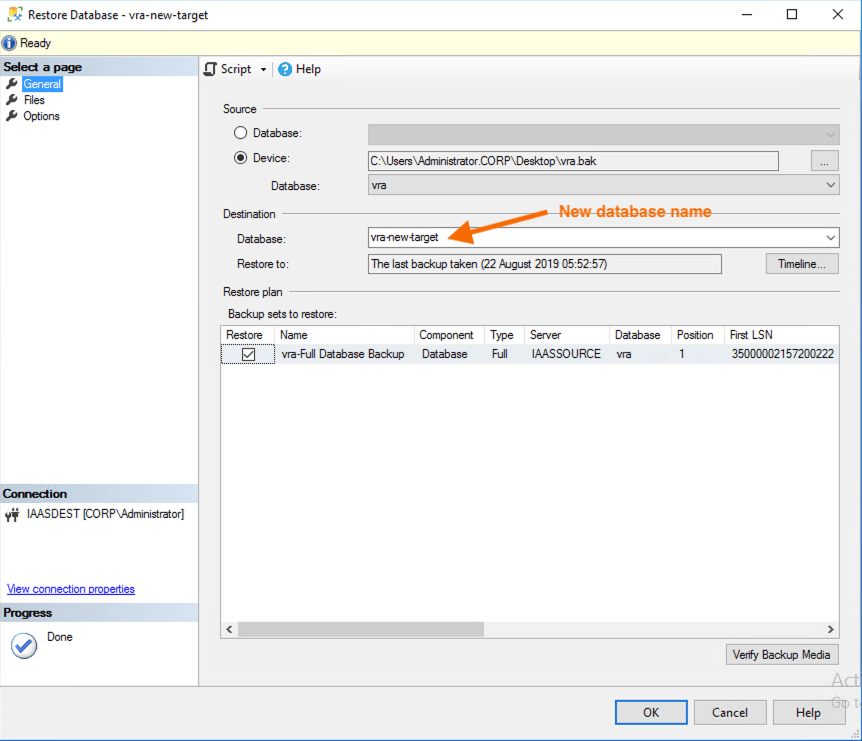
It doesn’t matter if you are sharing the same SQL platform for source and target vRA stacks as you should restore the database using a different name. This is so you can keep the original source database separate from the existing target database and new restored target database. By doing this you keep the source environment online and keep the original target database available should you need to retry the migration without having to restore that as part of the retry process.
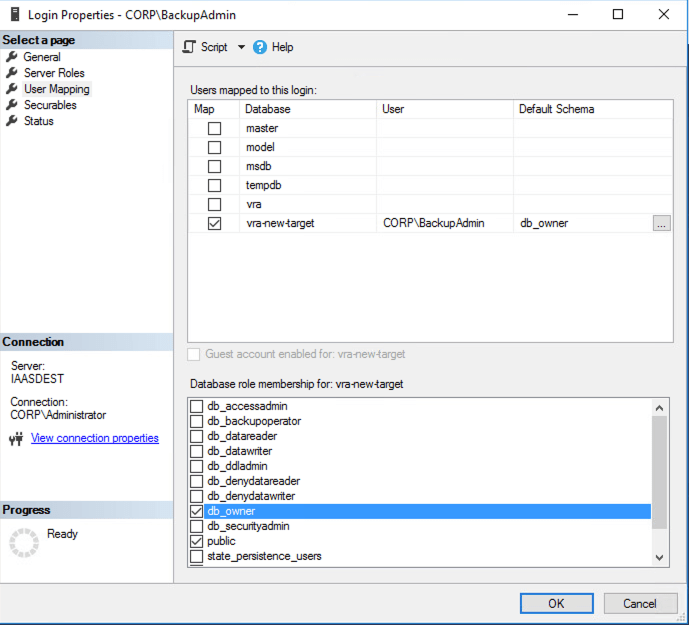
Once the database has been restored make sure the service account you are using in the new vRA target install has db_owner rights. You can do this by either assigning the correct account as “Owner” from the database properties or by mapping a new account to the restored database as follows:
12 – Running the Migration
Running the migration is the easiest part of the process as long as you have the right information to hand, all of which I have covered in the preceding steps.
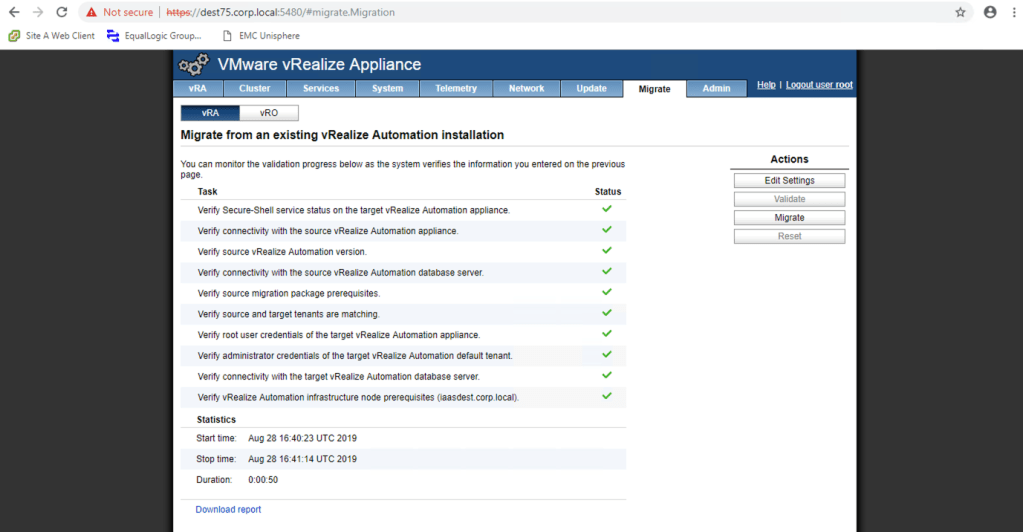
The migration wizard is located under the “Migrate” tab of the VAMI interface. It’s divided for vRA and vRO, in this instance I am using the vRA section as I am taking embedded vRA and embedded vRO content over to the target (external vRO to embedded vRO would require the vRO section of the wizard).

Before you can run the migration you must first perform an input validation which enables the target vRA install to verify that all your provided input is correct. If everything passes then you should end up with all green ticks as mine does below.
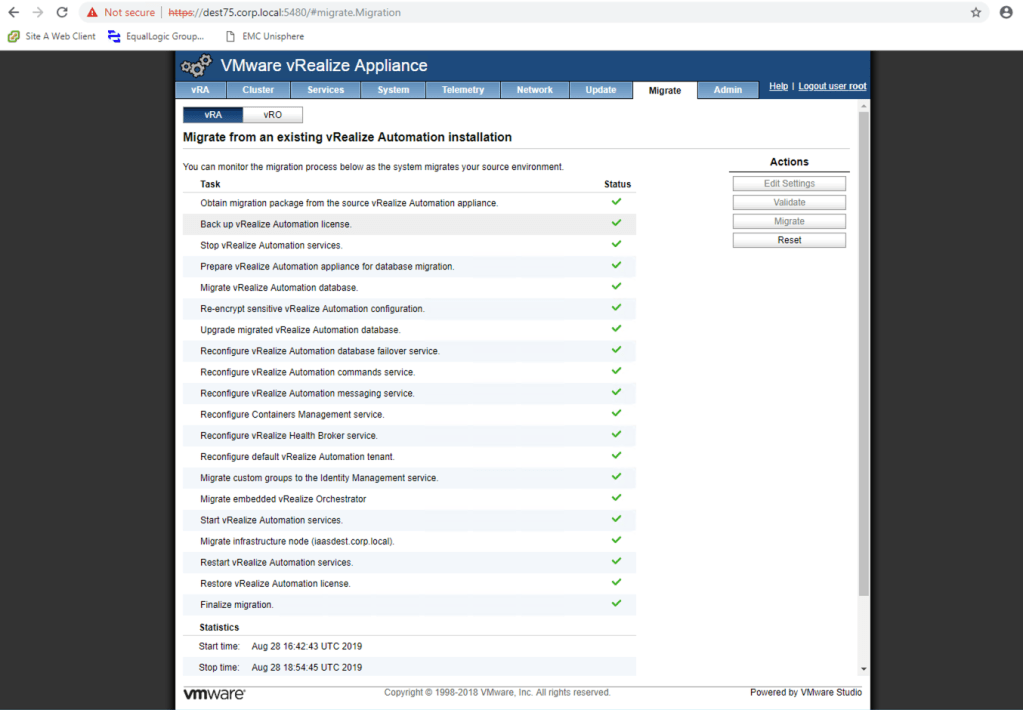
At this point there is nothing left to do apart from hit the “Migrate” button and wait for the wizard to complete all of the steps. Note that this process involves multiple service restarts on the destination which can take some time!

Here’s the finished migration screen. As you can see my migration took some time however bear in mind that I am using a resource constrained nested environment.
13 – Test & Tidy Up
Once the migration has completed successfully you need to perform so tasks however the tasks you need to complete depend on whether this has been a test migration or a migration you are going to now cut over into production. If this is a test then you next steps should concentrate on things like:
- Are all of your tenants working (login, items visible, actions available etc.)
- Are reservations and endpoints available
- Test connectivity to endpoints
- Does data collection work
- Adding Tenant and IaaS Admins (if coming from 6.x)
- Are custom vRO workflows visible within target embedded vRO
- Re-configured embedded vRO vRA connections to new target
- Testing custom workflows
Once you are happy the migration has been successful then you can repeat the process (starting at step 11) however please revert the snapshots on the target platform so that you are starting from a clean environment.
If you are cutting over this migrated target platform into production (please make sure you have run a test migration first) then you should do all of the above as well as:
- Re-configure load balanced services to include all pool members and health checks
- Revert session timeouts to original settings
- Power off source vRA stack (don’t delete for a few days!)
