Overview
In this part of my PKS Getting Started series I’m going to show a couple of examples of how you can interact with PKS to spin up clusters and what the end result is from an infrastructure and platform perspective.
Links to the other articles in this series can be found below.
- Part 1 Overview
- Part 2 Ops Manager and Bosh
- Part 3 NSX-T Prep
- Part 4 Installing PKS
- Part 5 Granting PKS Access
- Part 6 Cluster Operations
- Part 7 Cluster Access
- Part 8 Harbor Registry
PKS CLI Login
PKS operations are performed by executing API calls to the PKS control VM via the PKS CLI. This process looks something like the following (remember I am using an LDAP external identity source).
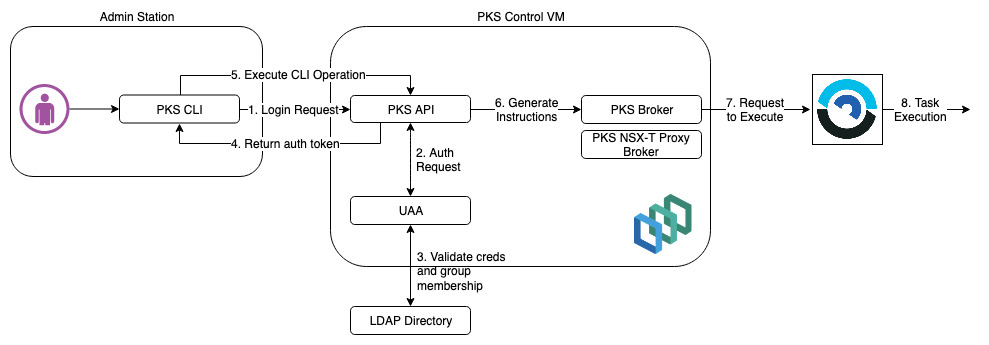
In my example I am going to be using the Windows version of the PKS CLI which I have downloaded from the Pivotal website (pivotal.io). There is no installation, just the executable.
The first thing I need to do is authenticate against the PKS API with a user that has permissions to PKS. In this case I am using “Administrator” which is my LDAP domain admin account that is a member of my “pks-admin” security group. This group has been mapped to the “pks.cluster.admin” UAA scope which will give it permissions for all PKS clusters.

I have also used the “-k” option to skip ssl validation as I have not copied the root CA of the PKS cert to my Windows machine (being lazy). With a CA issued cert on the PKS VM you would specify the root CA cert of the issuing authority using “–ca-cert” instead of “-k” to validate PKS.
Cluster Operations
The first thing I am going to do is issue a command to show me all the current PKS clusters that have been deployed together with their status. Here I can see that my smoke test cluster that the errand tasks are run against for testing my PKS configuration is still running (the smoke test from updating the PKS tile with new information hasn’t finished yet).

Now I can see if I am able to create a new PKS cluster as an end user. The format of the command is simple enough requiring a unique cluster name, and external hostname to access the Kubernetes API by, the plan name to use to build the cluster and the number of worker nodes to be placed in the cluster. All simple enough!

When the command is issued it returns focus to the command prompt straight away. It does not wait for the cluster to finish building although you can use the “–wait” option if you want to do this. Note that it could be ~30mins to build a cluster depending on size.
The cluster will show a “succeeded” status when it has been built successfully.

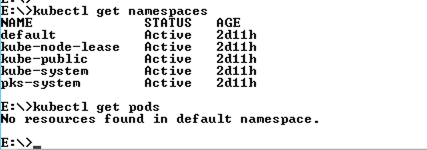
Now that I have a cluster up and running I will probably need to access it to deploy pods etc. In order to do this I need to be able to authenticate into the cluster which is also performed by the PKS CLI using the “get-credentials” option. This process populates a kubeconfig file on my client machine with all the connection information for the cluster I have retrieved the credentials for (the location of the file will be under my users home directory under “.kube”).

With the kubeconfig file populated from the above command I can now execute the usual Kubernetes commands via kubectl.
Note: for kubectl commands to work I need to be able to resolve and access my cluster via the external hostname I set when creating it. This should resolve to the load balanced virtual server on port 8443 which in turns passes traffic to the master node(s). If you don’t do this you will get a “unable to connect to server” error.
Here I am just looking at the namespaces and fetching pod information from the default namespace.
Tracking via BOSH
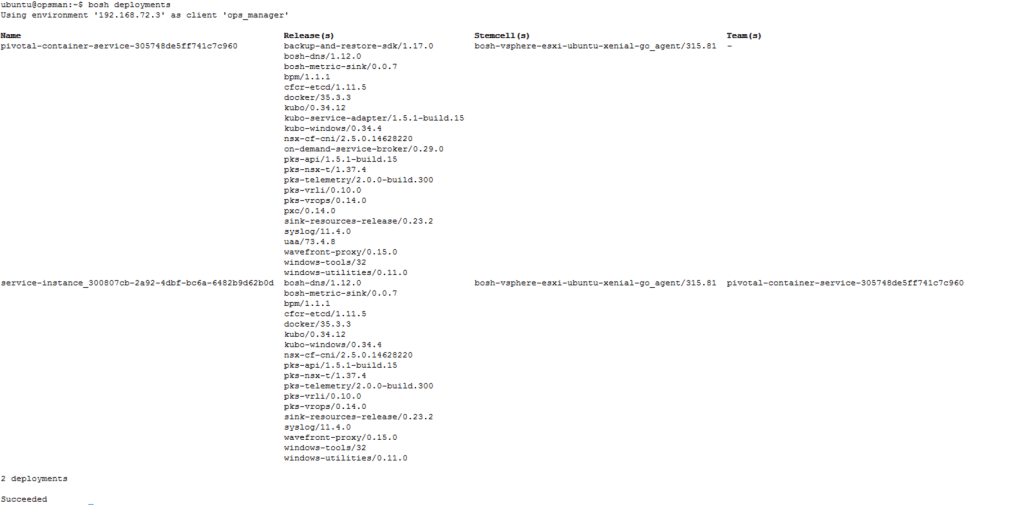
As a cluster builds I can track the BOSH tasks that are being generated and their output. This is done by using the BOSH client on Ops Manager to interrogate BOSH Director (remember to get the BOSH command line credentials from Ops Manager and export them before trying to run BOSH commands).
Here I am fetching all the deployments to allow me to grab a deployment ID that represents my PKS cluster being built (this is easy as I only have one cluster) however you can use the cluster UUID from the PKS CLI output above pre-fixed with “service-instance_” which will equal the BOSH deployment ID for your cluster.
Once I have the ID of the deployment that represents the PKS cluster I am deploying I can then interrogate it to show the cluster layout and other details.

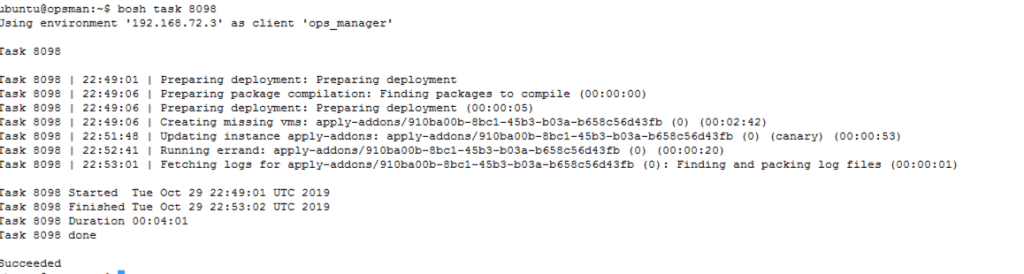
Next I can track the state of the current deployment by fetching the output of the tasks. In this case I am viewing a list of all running tasks and using the IDs of from the list to get further details however I can also fetch the details that are explicitly linked to my PKS cluster deployment by running a “bosh -d <DEPLOYMENT_ID> task -a”.

The output of the first task relates to building the cluster VMs and forming the cluster.

The output of the second task is for deploying the add-ons such as kube-dns.
A recent list of all tasks can be retrieved by running “bosh tasks –recent” which defaults to the last 30 tasks.

PKS CLI commands to delete a cluster and track the deletions tasks in BOSH can also performed in the same way as those that I have listed in this article.
How Does This Look In NSX?
That’s a very good question. Lets take a look at NSX Manager and see what’s been created.
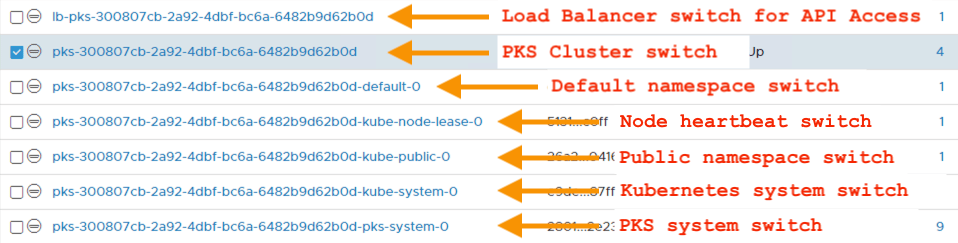
First the logical switches. Most of this looks as you would expect for a Kubernetes cluster (default namespace etc) however there are a few differences. There is a switch for load balancing which is attached to the PKS Tier 1 router (in straight Kubernetes the Tier 1 for load balancing is only connected to Tier0 and has no switch). Also the “nsx-system” switch used in native Kubernetes is replaced by the “pks-system” switch.
The routing follows the same differences with one Tier1 router for every function and namespace logical switch.

Every namespace created on my PKS cluster has had a corresponding SNAT rule created on my Tier0 router with the IPs taken from my external services IP pool.

The load balancing configuration is mostly the same as a standard Kubernetes deployment however there is an additional virtual server advertising on port 8443. This is a key difference as PKS allows multiple Kubernetes clusters to be grouped together (if your plan(s) allow for multiple masters) with all the masters in your deployment load balanced using this virtual server for API access.

In the next article I will be looking VMware Harbor Registry and how that links into my PKS environment.

Pingback: PKS – Getting Started Part 5 Granting Access | vnuggets
Pingback: PKS – Getting Started Part 4 Installing PKS | vnuggets
Pingback: PKS – Getting Started Part 3 NSX-T Prep | vnuggets
Pingback: PKS – Getting Started Part 2 Ops Manager and BOSH | vnuggets
Pingback: PKS – Getting Started Part 1 Overview | vnuggets
Pingback: PKS Getting Started Part 7 Cluster Access | vnuggets
Pingback: PKS – Getting Started Part 8 Harbor Registry | vnuggets