Overview
Welcome to the second part of this series of articles covering Kubernetes and NSX-T. In part 1 I covered the high level architecture and getting the container hosts built. In this part I am going to go through deploying Docker and Kubernetes.
This series of articles includes:
- Part 1 – Deploying Container Hosts
- Part 2 – Deploying Docker & Kubernetes
- Part 3 – Creating a Kubernetes Cluster
- Part 4 – Configuring NSX-T Ready for NCP
- Part 5 – Deploying and Configuring NCP for NSX-T
- Part 6 – Testing the Platform
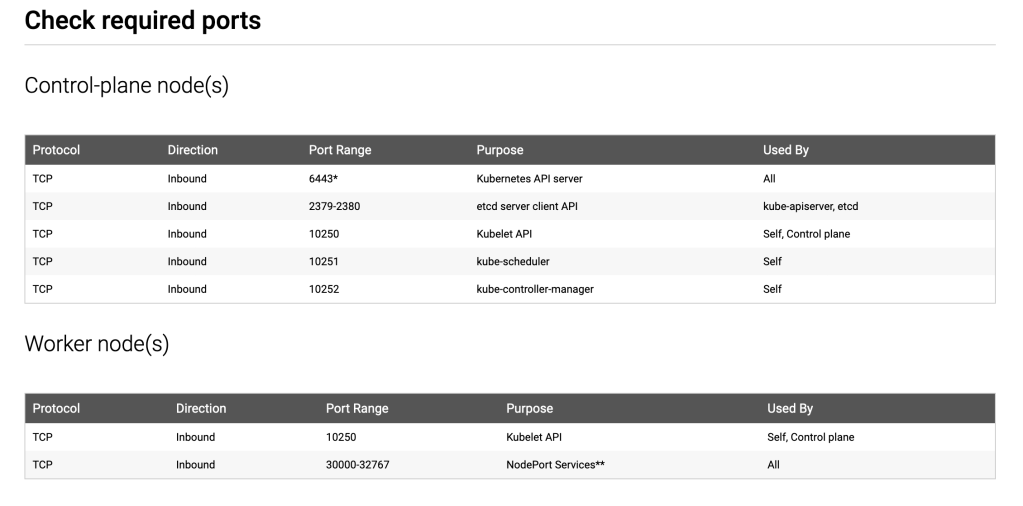
OS Level Firewalls
Before applications are installed the firewall on each of my 3 machines needs to have rules defined to allow incoming communications over ports that Kubernetes uses. It is better to do this prior to installation rather than troubleshooting why your deployment doesn’t work!
The required inbound ports are listed on the Kubernetes website (here). They are as follows (control plane node = master node):
Ports are opened up using “firewall-cmd” as follows (note that the screenshot only shows the commands for some of the ports for the Kubernetes master). Make sure you open the right ports on the right hosts!
Performing a “firewall-cmd –list-all” allows me to verify that all the ports I have requested to be opened are actually active.

Installing Docker
Next I’m going to install docker using the package management utility “yum” (the default for CentOS). This process needs to be repeated on all 3 hosts. There are no special version requirements so yum can be left to use the latest docker package in the repository.

Installing Kubernetes
Installing Kubernetes is a little different to docker. Kubernetes packages are not held on the default YUM repositories that come with CentOS therefore to perform an install I need to create a new repository file that tells each machine where to get the installation files from (or alternatively you could download the files via another means and perform an offline install).
This repository file is created in “/etc/yum.repos.d” which I have called “kubernetes.repo”. This should also be done on all 3 hosts.

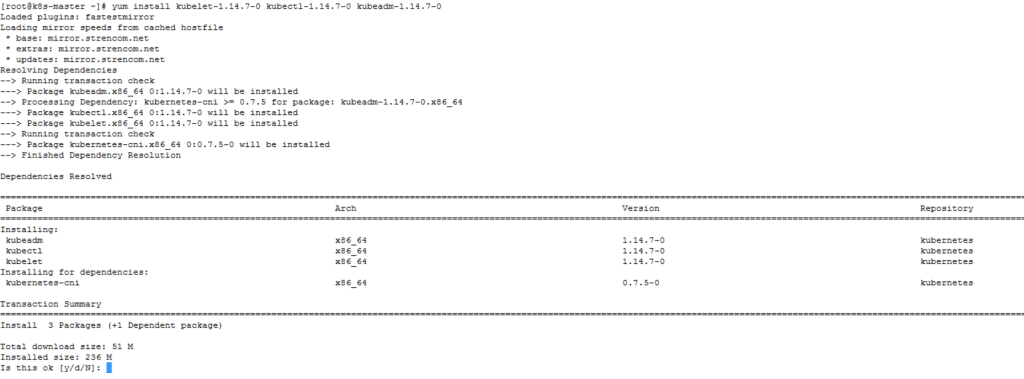
The version of Kubernetes also needs to be specified to ensure that the installation is compliant to the compatibility list from part 1 of this series of articles. In this case I am going to use the latest version from the list (1.14). To find out the exact package version name to use you can run:
sudo yum --showduplicates list <package_name>
Kubernetes is made up of 3 packages (kubeadm, kubectl and kubelet) which all use the same versioning so I can use any of the 3 package names to obtain the version numbers available. In this case I am using “kubeadm”.

The latest version of kubeadm 1.14 is listed as version 1.14.7-0 so this is the one I am using for my Kubernetes deployment on all 3 hosts.

All 3 packages can now be installed specifying the exact version number on the end of each package name (i.e. kubeadm becomes kubeadm-1.14.7-0).
Starting and Enabling Services
Now that docker and Kubernetes are installed the docker and Kubernetes node agent (kubelet) services need to be started and also set to start automatically on boot up for all 3 hosts. This is done using “systemctl” with CentOS as follows on each host.
sudo systemctl start docker
sudo systemctl start kubelet

sudo systemctl enable docker
sudo systemctl enable kubelet
In the next part of this series I will cover forming the Kubernetes cluster.

Pingback: Kubernetes and NSX-T – Part 1 Deploying Container Hosts | vnuggets
Pingback: Kubernetes and NSX-T – Part 3 Creating a Kubernetes Cluster | vnuggets
Pingback: Kubernetes and NSX-T – Part 4 Configuring NSX-T Ready for NCP | vnuggets
Pingback: Kubernetes and NSX-T – Part 5 Deploying and Configuring NCP for NSX-T | vnuggets
Pingback: Kubernetes and NSX-T – Part 6 Testing The Platform | vnuggets