Overview
Welcome to the sixth part of this series of articles covering Kubernetes and NSX-T. In the last article I got as far as deploying the VMware Network Container Plugin. In this article I am going to show what the NCP deployment has done to my NSX-T install and I will be testing the platform.
This series of articles includes:
- Part 1 – Deploying Container Hosts
- Part 2 – Deploying Docker & Kubernetes
- Part 3 – Creating a Kubernetes Cluster
- Part 4 – Configuring NSX-T Ready for NCP
- Part 5 – Deploying and Configuring NCP for NSX-T
- Part 6 – Testing the Platform
NSX-T Configuration Applied by NCP
When the Network Container Plugin was deployed and configured in the last article Kubernetes orchestrated several changes to NSX-T in the background to support the installation.
The first thing to realize is that NCP 2.5.0 (and previous versions) do not yet use the NSX-T policy interface so all changes made by Kubernetes are usually only visible when using the “Advanced Networking & Security” view. For example, lets look at the network segments (i.e. the logical switches).
The policy view shows:
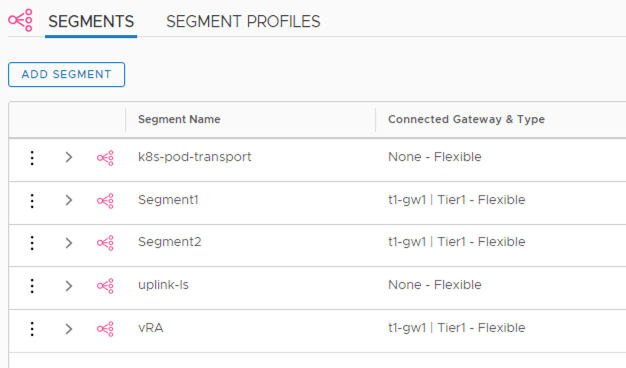
However, the advanced interface shows something different. NCP has created 5 new logical switches (several of those shown are from my own testing so I am not including them in the count). As they are not under policy control they have no policy icon next to their names.

Each logical switch corresponds to a Kubernetes namespace. For example, NCP is deployed into the namespace “nsx-system” and has multiple PODs (for NCP and agents). The logical switch that is used for “nsx-system” is named after the Kubernetes cluster it belongs to as well as the actual namespace (“k8s-cluster1-nsx-system-0”).
Other logical switches exist for things such as DNS PODs and the default namespace (used when you deploy PODs without specifying a namespace).
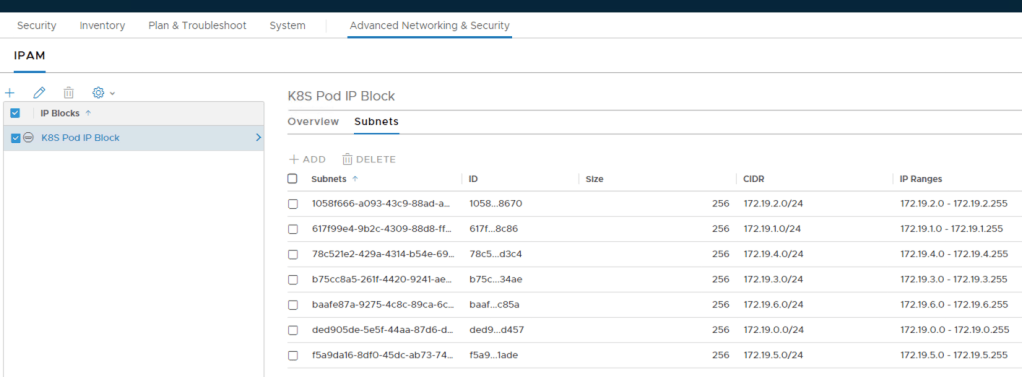
The subnets created for each Kubernetes namespace can also be seen by checking how the IP Block has been carved up.
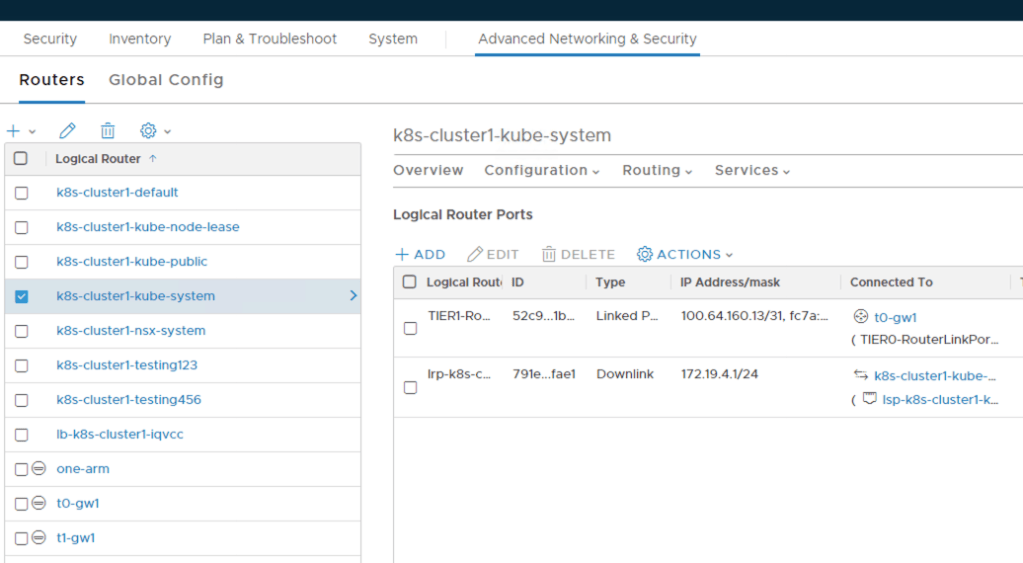
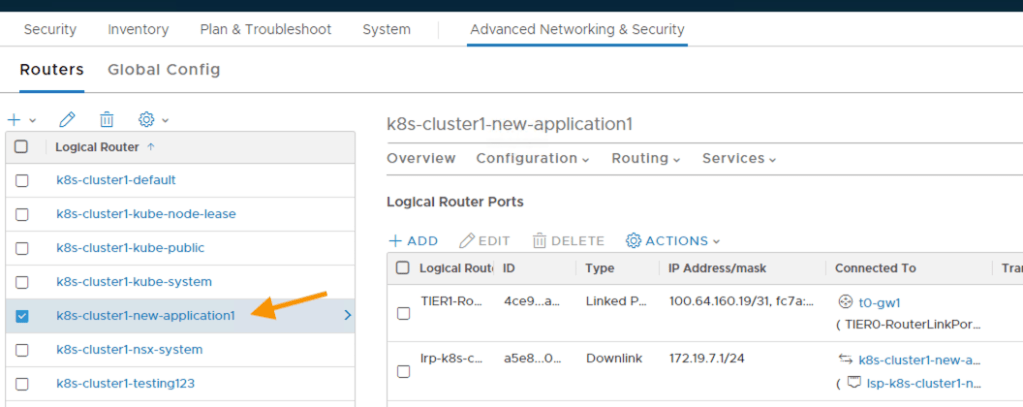
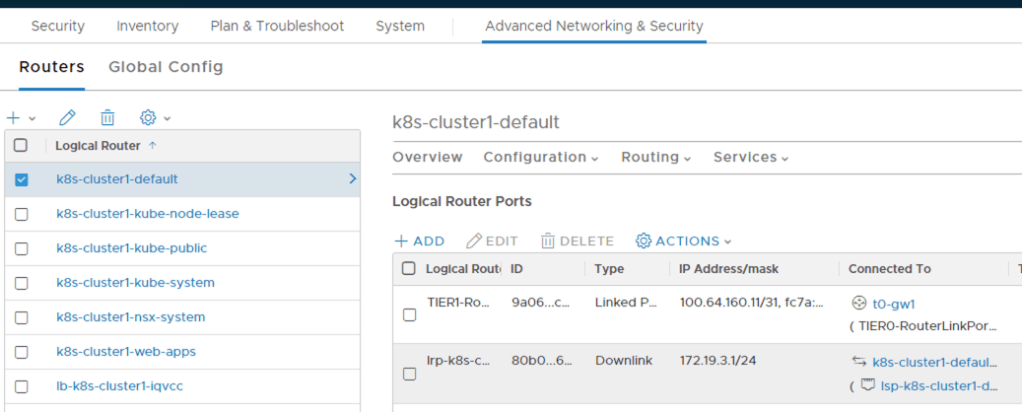
The router configuration is inline with the logical switches. Each switch created needs routing capabilities to the outside world therefore corresponding Tier1 routers have been automatically deployed which in turn have up-links to my Tier0 router (“t0-gw1”). I can also see the subnet assigned to the logical switch (and therefore namespace) by checking the “downlink” port on the Tier1 router.
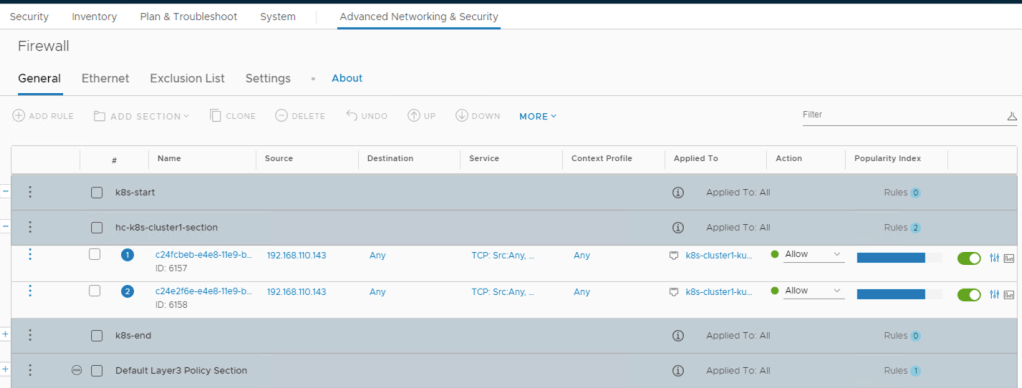
Looking at the firewall rule set I can now see an initial set of rules that have been automatically added to facilitate communication into both of the DNS PODs for TCP port 8080.
Testing – Creating a Kubernetes Namespace
Now that I can see the configuration that has been applied to NSX-T by Kubernetes (and NCP) I can start to test this powerful combination out.
First of all I’m going to create a new namespace in Kubernetes which might represent a new set of applications.

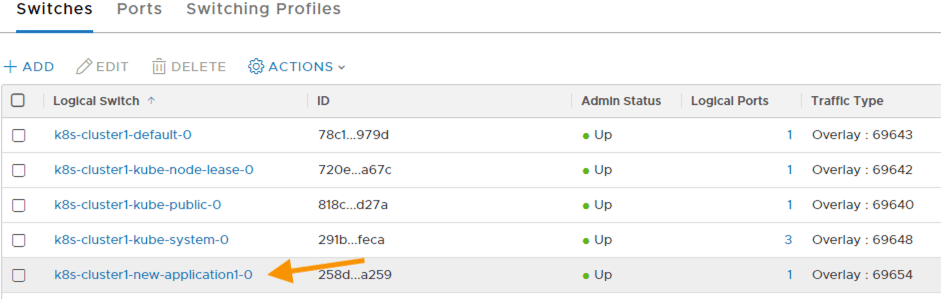
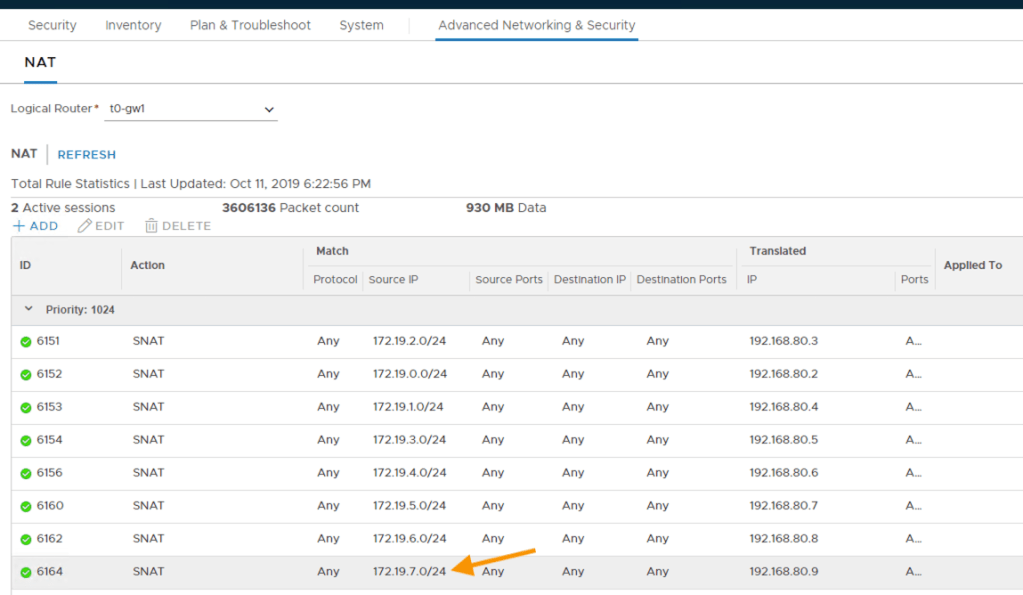
Once the namespace is created NCP automatically deploys the logical switch, Tier1 router, assigns a subnet and creates a SNAT rule on the Tier0 gateway to translate the assigned subnet to a NAT address (also automatically obtained from the NAT IP Pool).
Testing – Deploying a POD
To test my implementation I am going to deploy an application and load balanced service. Kubernetes uses manifest files (in either yaml or json format) to describe what the application and its services looks like so I need to create one.
In this example I am going to create a very basic yaml manifest file that describes a configuration for a single POD that contains one nginx container with a replicaset value of 2 (to make sure there is always 2 instances running) as well as a load balanced service on port 80 distributing connections between the PODs. To build a manifest file for this I will need to use the following Kubernetes object types to describe the desired configuration and state:
- Service – details the load balancing configuration to be applied including member PODs
- Deployment – describes how a set of PODs should be created and run (replicas etc.)
Notice that in the following manifest file I have labelled all the various parts with the same key pair value (app: lb-web-app). This will allow me to delete the PODs and Services in the future by specifying one label in a single command.
apiVersion: v1
kind: Service  #Object type used to describe a service
metadata:
   name: lb-web-service #The name the service will be called
   labels:
      app: lb-web-app   #A label added to the service
spec:   #The specification of the service
   type: LoadBalancer #A load balanced service
   ports:   #The port the load balanced service will advertise on
   - port: 80
   selector:   #Label(s) used to select the underlying pool members
      app: lb-web-app
---   #Marks the start of a new section within the manifest
apiVersion: apps/v1
kind: Deployment #The configuration of replica Kubernetes PODs
metadata:
   name: lb-web-deployment #Name of the deployment
   labels:
      app: lb-web-app  #A label used to to tag the deployment
spec:   #The specification of the deployment
   replicas: 2  #The number of replica PODs to maintain available
   selector:
      matchLabels:   #The method used to select the POD template
         app: lb-web-app  #The label to use to locate the template
   template:   #The template definition for each replica POD
      metadata:
         labels:
            app: lb-web-app  #A label used to tag the template
      spec:
         containers:   #The containers in each replica POD
         - name: web-container #Container name
           image: nginx #The image to use to create the container
           ports:
           - containerPort: 80 #The port used (unique within the POD)
Once I have my manifest I can apply it using kubectl.

Notice that in this case the output says my web service is unchanged. This is because I had an error in the deployment section of my manifest file when I initially ran it. It got as far as creating the NSX-T virtual server and pool but not further. The next time I applied the manifest file there were no changes required for this service so the execution proceeded directly to the deployment.
So lets see what has been created. First of all I will look at Kubernetes. Here I can see my 2 PODs (remember I specified a replicaset value of 2). I can also see they have been created under the “default” namespace. That’s my mistake, i forgot to specify the namespace to use (-n <NAMESPACE>) when I applied the manifest file!

If I used the “-o wide” option on the same command I should be able to see some additional details such as the IP address of each POD together with the name of the node each POD is running on. The IP addresses are from the subnet carved out for the “default” namespace when NCP was first configured.

Now lets see if I can find my load balanced service. I can use kubectl to return all of the services configured. From the output I can see my service has been created with an IP from my external IP address pool (192.168.15.x) and will handle TCP ports from 80 to 30365.

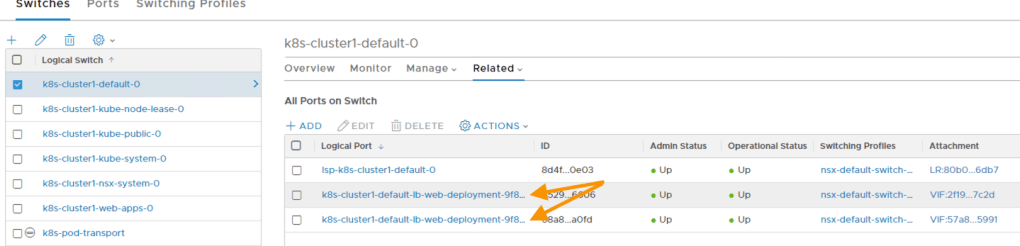
Great, now lets look at NSX-T. My logical switch should have an additional two ports created on it, one for each POD (remember I need to look at the default switch due to my earlier error).
My Tier1 router is attached to the logical switch on a downlink port and to my Tier0 router via a Linked Port. This hasn’t changed from the pre-starting config as the manifest doesn’t create any namespace.
A load balanced virtual server has been created on the load balancer created for my Kubernetes cluster.

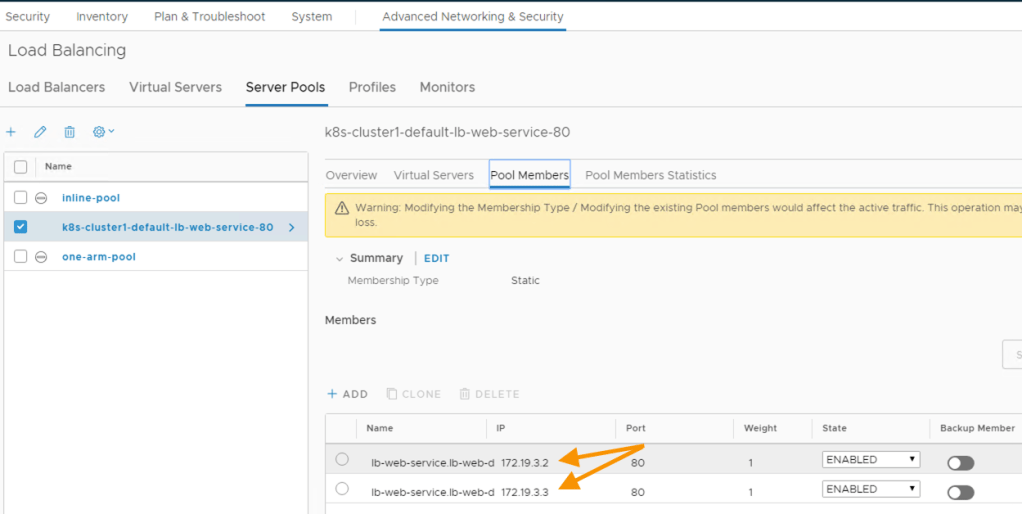
The pool used by the virtual server should also have my 2 PODs within it which it does. The IP addresses in the pool also match those displayed in the list of PODs (using the wide option).
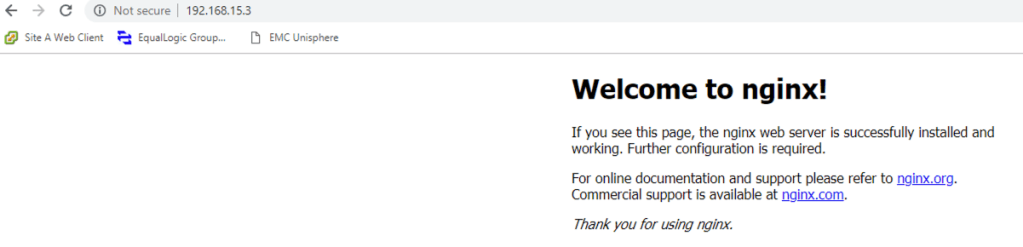
Lastly I should be able to send a web request to the load balanced service and receive a response from the PODs within the pool.

This completes this 6 part series. Stay tuned for more articles!

Pingback: Kubernetes and NSX-T – Part 5 Deploying and Configuring NCP for NSX-T | vnuggets
Pingback: Kubernetes and NSX-T – Part 4 Configuring NSX-T Ready for NCP | vnuggets
Pingback: Kubernetes and NSX-T – Part 3 Creating a Kubernetes Cluster | vnuggets
Pingback: Kubernetes and NSX-T – Part 2 Deploying Docker and Kubernetes | vnuggets
Pingback: Kubernetes and NSX-T – Part 1 Deploying Container Hosts | vnuggets
Pingback: Kubernetes and NSX-T – Firewall Rules with Network Policies | vnuggets