Overview
Welcome to the fifth part of this series of articles covering Kubernetes and NSX-T. In the last article I got as far as completing all the base NSX-T configuration ready for deploying the VMware NCP (Network Container Plugin). In this article I am going to cover what needs to be done to deploy the VMware NCP and then configure it, together with what things look like once completed.
This series of articles includes:
- Part 1 – Deploying Container Hosts
- Part 2 – Deploying Docker & Kubernetes
- Part 3 – Creating a Kubernetes Cluster
- Part 4 – Configuring NSX-T Ready for NCP
- Part 5 – Deploying and Configuring NCP for NSX-T
- Part 6 – Testing the Platform
Loading NCP into Docker Registry
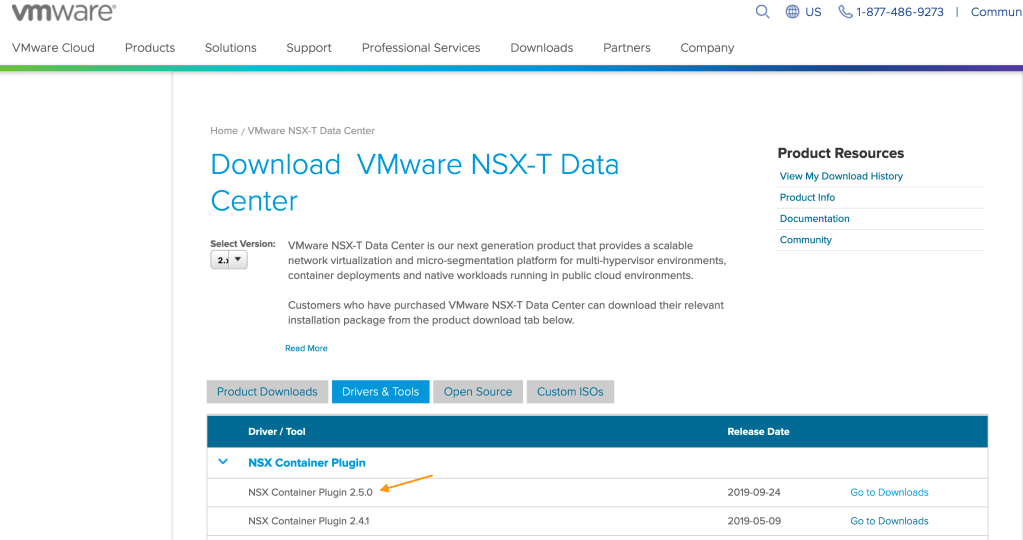
The Network Container Plugin is deployed as containers within Kubernetes PODs on each Kubernetes machine. It comes as a tarball contained within the nsx container plugin zip file which is downloaded from the VMware downloads website (note I am using the latest version which corresponds to my NSX-T version as well).
Kubernetes orchestrates the container engine (docker) so before I can ask Kubernetes to deploy NCP (which in turn deals with docker) I need to load the NCP image into the docker registry on each of my 3 machines. This is completed by copying the tarball file for the OS type (in my case I’m using CentOS whose upstream source RedHat so I’m using the RHEL file) onto each machine and running the “docker load” command for the tarball file.

Once completed the image is available to be deployed by docker (and therefore by Kubernetes with the right configuration file) however the name of the image in each machines local registry is long and cumbersome. To make the image name easier to remember and use I am going to create an image tag with a simpler/shorter name. This enables me to refer to the image via the new tag name instead of the long image name.
Running a “docker image ls” command shows all the images in the local registry on a machine. By using “docker image tag <SOURCE_IMAGE> <TAG_NAME>” I can add a new entry to the registry however the “IMAGE ID” is exactly the same which shows they are one in the same image. I have repeated this process on all 3 of my machines.

Populating the Configuration File
In order for Kubernetes to be able to deploy a POD (and the containers within) a configuration file needs to be created and referenced during the deployment commands. In previous version of VMware NCP there were multiple configuration files, one for NCP and the other for the NSX Node Agent. With version 2.5.0 only a single configuration file is used although it contains the sections from both of the older versions files.
The configuration file comes within the container plugin zip file however it needs modifying before it can be used to deploy the plugin. Note there are many sections within this file so what I am going to cover here is just enough to get my platform functional. The first part of the file deals with resource definitions, namespaces, roles, service accounts and authentication certificates. I am not changing any of this.
The next parts of the file are for NCP and NSX Node Agent and contain similar sections to each other. NCP uses:
- Default – things like logging settings
- nsx_v3 – NSX manager config & auth, load balancer config, IP blocks and pools, firewall sections
- ha – failover config for NCP Master
- coe – Container orchestrator adapter configuration
- k8s – Kubernetes API configuration
- Deployment – the instructions for Kubernetes to deploy a NCP POD
NSX node agent uses:
- Default – things like logging settings
- k8s – Kubernetes API configuration
- coe – Container orchestrator adapter configuration
- nsx_kube_proxy – service configuration
- nsx_node_agent – Open vSwitch configuration
My entry point to start making changes is here (the NCP part of the file).

The areas I have modified within the NCP portion of the file for nsx_v3 are as follows:
Note for connectivity to NSX manager I am using username and password authentication however you should consider using certificate authentication for greater security.
# IP address of one or more NSX managers separated by commas. The IP
# address should be of the form:
# [<scheme>://]<ip_adress>[:<port>]
# If
# scheme is not provided https is used. If port is not provided port 80 is
# used for http and port 443 for https.
nsx_api_managers = nsxm.corp.local
nsx_api_user = admin
nsx_api_password = VMware2!VMware2!
# Option to use native load balancer or not
use_native_loadbalancer = True
# Option to auto scale layer 4 load balancer or not. If set to True, NCP
# will create additional LB when necessary upon K8s Service of type LB
# creation/update.
l4_lb_auto_scaling = True
# Option to set load balancing algorithm in load balancer pool object.
# Choices: ROUND_ROBIN LEAST_CONNECTION IP_HASH WEIGHTED_ROUND_ROBIN
pool_algorithm = ROUND_ROBIN
# Option to set load balancer service size. MEDIUM Edge VM (4 vCPU, 8GB)
# only supports SMALL LB. LARGE Edge VM (8 vCPU, 16GB) only supports MEDIUM
# and SMALL LB. Bare Metal Edge (IvyBridge, 2 socket, 128GB) supports
# LARGE, MEDIUM and SMALL LB
# Choices: SMALL MEDIUM LARGE
service_size = SMALL
Note in the sections for defining IP blocks and pools I am using the object IDs
# Name or UUID of the container ip blocks that will be used for creating
# subnets. If name, it must be unique. If policy_nsxapi is enabled, it also
# support automatically creating the IP blocks. The definition is a comma
# separated list: CIDR,CIDR,... Mixing different formats (e.g. UUID,CIDR)
# is not supported.
container_ip_blocks = 6268bfd1-2515-4ebb-a3d5-1baa23ef069e
# Name or UUID of the external ip pools that will be used for allocating IP
# addresses which will be used for translating container IPs via SNAT
# rules. If policy_nsxapi is enabled, it also support automatically
# creating the ip pools. The definition is a comma separated list:
# CIDR,IP_1-IP_2,... Mixing different formats (e.g. UUID, CIDR&IP_Range) is
# not supported.
external_ip_pools = 9a58aa1a-3085-418f-918d-586b3a5f7115
# Name or UUID of the top-tier router for the container cluster network,
# which could be either tier0 or tier1. When policy_nsxapi is enabled,
# single_tier_topology is True and tier0_gateway is defined,
# top_tier_router value can be empty and a tier1 gateway is automatically
# created for the cluster
top_tier_router = t0-gw1
# Name or UUID of the external ip pools that will be used only for
# allocating IP addresses for Ingress controller and LB service
external_ip_pools_lb = 9a30d7f9-ccc3-4ef9-ba1f-dd7cbf0b0a3b
Here I have reverted to using object name for providing my NSX-T transport zone as through testing I have verified that these do work.
# Name or UUID of the NSX overlay transport zone that will be used for
# creating logical switches for container networking. It must refer to an
# already existing resource on NSX and every transport node where VMs
# hosting containers are deployed must be enabled on this transport zone
overlay_tz = Overlay-TZ
# Name or UUID of the firewall section that will be used to create firewall
# sections below this mark section
top_firewall_section_marker = 8391fdd8-8c0e-4b69-b3d4-5ae8a1d93f8c

# Name or UUID of the firewall section that will be used to create firewall
# sections above this mark section
bottom_firewall_section_marker = e515d8a5-1387-4f16-9426-9173aa09a00c
The NCP coe configuration modifications are minimal however this is where I can define my Kubernetes cluster name. I have made sure the name I am using here matches the tag value used on the Kubernetes node switch ports.
# Specify cluster for adaptor.
cluster = k8s-cluster1
# Enable SNAT for all projects in this cluster
enable_snat = True
# The type of container host node
# Choices: HOSTVM BAREMETAL CLOUD WCP_WORKER
node_type = HOSTVM
NCP k8s changes tell NCP how to contact the Kubernetes API:
# Kubernetes API server IP address.
apiserver_host_ip = 192.168.110.141
# Kubernetes API server port.
apiserver_host_port = 6443
The NSX node agent changes are (starting with k8s):
# Kubernetes API server IP address.
apiserver_host_ip = 192.168.110.141
# Kubernetes API server port.
apiserver_host_port = 6443
NSX node agent coe changes:
# Specify cluster for adaptor.
cluster = k8s-cluster1
# Enable SNAT for all projects in this cluster
enable_snat = True
# The type of container host node
# Choices: HOSTVM BAREMETAL CLOUD WCP_WORKER
node_type = HOSTVM
nsx_node_agent section changes define how Open vSwitch will be configured. Note that in previous versions of NCP this type of configuration would have been done within the CentOS operating system, manually creating the bridge and attaching an interface to it as an uplink. With 2.5.0 the control of Open vSwitch is moved into a container within the NCP pod which is why these configuration options are within this file.
# OVS bridge name
ovs_bridge = br-int
The name of the uplink should match the 2nd adapter on each of the 3 machines. This will be the adapter that Kubernetes uses as the uplink for each Open vSwitch that is created (one per machine).
# The OVS uplink OpenFlow port where to apply the NAT rules to.
ovs_uplink_port = ens224
Deploying NCP via Kubernetes (kubectl)
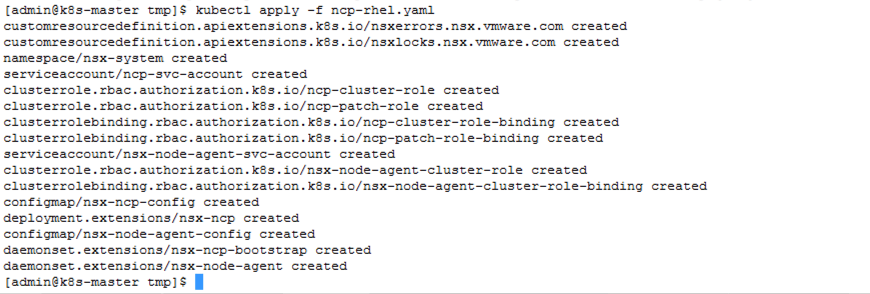
Now that my configuration (yaml) file has a basic setup within it. I can use the file to deploy NCP using “kubectl” on the machine running the master Kubernetes role. Note this only has to be done once from the master (in my case “k8s-master”), not on all 3 machines!
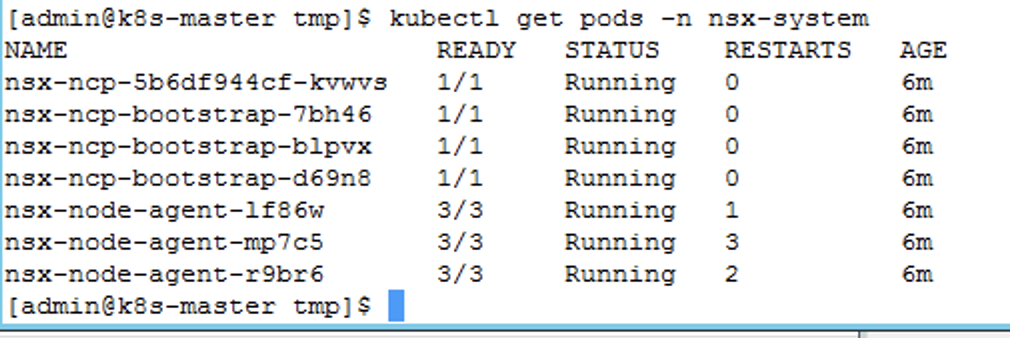
After the deployment I inspected the nsx-system namespace (the namespace where NCP is deployed into by default) and found that most of the PODs were in a constant crash and restart loop as shown below.

To work out what’s going on I can look at the logs of each POD and container. “kubectl logs nsx-node-agent-5s9f9 -c nsx-node agent” fetches the logs for the POD “nsx-node-agent-5s9f9” and the “nsx-node-agent” container within. If you are unsure of the container name you can run the command with no container name which will produce an error telling you all the containers within the specified POD (you can also use a “kubectl describe pod <INSERT_POD_NAME> -n nsx-system”).
The logs show that some of my IP pools cannot be located. Sure enough I have a typo in the object IDs!

Now after some corrections in the configuration file and re-deploying NCP the PODs look much better.
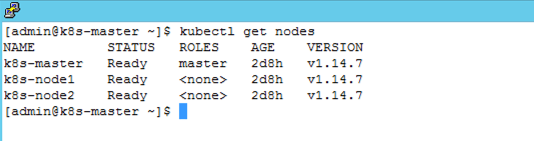
The Kubernetes node configuration also shows all the nodes are in a ready state.
In the next article I am going to cover the outcome of deploying NCP (i.e. what has happened in NSX-T) and starting to test the platform so I can see the changes Kubernetes makes as namespaces, PODs and containers are deployed.

Pingback: Kubernetes and NSX-T – Part 1 Deploying Container Hosts | vnuggets
Pingback: Kubernetes and NSX-T – Part 2 Deploying Docker and Kubernetes | vnuggets
Pingback: Kubernetes and NSX-T – Part 3 Creating a Kubernetes Cluster | vnuggets
Pingback: Kubernetes and NSX-T – Part 4 Configuring NSX-T Ready for NCP | vnuggets
Pingback: Kubernetes and NSX-T – Part 6 Testing The Platform | vnuggets